* Please read this entire guide closely before operating the DF Wash.
This product is classified as Class A. In a domestic environment, it might cause radio interference. In such cases, the user may be obligated to take appropriate measures.
Liability Statement
The information in this manual is subject to change without notice. Shanghai Fusion Tech Co. Ltd. (referred to as "Raise3D" here) is not responsible for errors in this manual, and also not responsible for incidental or secondary losses caused by the supply, performance or use of this manual. Shanghai Fusion Tech Co. Ltd. does not provide any guarantees for this manual, including but not limited to implied guarantees for marketability and suitability for specific purposes. The system owner/material purchaser is responsible for determining whether the Raise3D material is safe, legal, and technically suitable for the intended application and, at the same time, deciding the appropriate disposal (or recycling) method in compliance with local environmental regulations. Unless Raise3D's standard sales conditions are stipulated, Raise3D will not be liable for any losses caused by the use of the products described in this manual. The system owner/material purchaser is responsible for determining whether the materials used meet the requirements of Raise3D. Otherwise Raise3D will not be responsible for any losses caused by using the products described in this manual.
Copyright Statement
This document is protected by copyright and all rights reserved. The use, disclosure and possession of this document are restricted by the software copyright and the agreement established by Raise3D. Nothing in this document may be photocopied, reproduced, or translated into another language, unless prior written permission from Shanghai Fusion Tech Co. Ltd. is obtained.
All drawings and information in this manual are the property of Shanghai Fusion Tech Co. Ltd. All unauthorized use and copying are prohibited.
Trademark Property Statement
Raise3D, ideaMaker and RaiseCloud are registered trademarks of Shanghai Fusion Tech Co. Ltd.
WINDOWS is a registered trademark of Microsoft Corporation.
macOS is a registered trademark of Apple Inc.
All other product names and trademarks are the property of their respective owners, and Raise3D is not responsible for the selection, performance or use of these non-Raise3D products. Product specifications are subject to change without notice.
Please read this information carefully to ensure that you use the machine safely.
General Information

You can find general information about this instruction manual here.
§ Read this instruction manual carefully. Only this will ensure you use the machine safely and efficiently.
§ This manual is intended for the installer and the user of the machine.
§ Follow the safety instructions and warnings.
§ Keep the instruction manual and the product information safe for future reference or for the next owner.
§ Check the machine after unpacking it. Do not connect the machine if it has been damaged in transit.
§ If you have any questions, please contact our local service center or distributors.
§ Any failure and losses caused by ignoring the following items mentioned, and cautions mentioned in the operation and installation instruction are not covered by our warranty and any liability.
Intended Use
Read the information on intended use to ensure that you use the machine correctly and safely.
Only use this machine:
§ In accordance with this installation and instruction manual. Make sure to follow the installation and instruction manual for the hardware installation and cleaning solvent feeding, as detailed in chapter C and chapter E.
§ In a well-ventilated and dry environment without any open flames;
§ The environmental conditions used are:
Operating Ambient Temperature: 10-35 °C, 10-90% RH non-condensing;
Storage Temperature: -25 °C to +55 °C, 10-90% RH non-condensing.
Restriction on User Group
§ Keep children, pets and vulnerable people away from the machine.
§ This equipment is not suitable for use in locations where children are likely to be present.
§ This machine can be utilized by individuals with limited physical, sensory, or mental capabilities or insufficient experience and knowledge, as long as they are supervised or adequately instructed in its safe usage and understand the associated risks.
Safe Installation
Take note of the safety instructions when installing the machine.
WARNING - Risk of Flammability!
§ Improper use and storage of cleaning solvent is dangerous.
Cleaning solvent is isopropyl alcohol (IPA), which belongs to flammable liquids.
Various open flames, heat sources, or sparks are strictly prohibited after the cleaning solvent is unsealed or during its use.
Cleaning solvent should be stored in the closed containers, in a dry and dark place, and away from various open flames, heat sources, or sparks.
WARNING - Risk of Electric Shock!
§ Improper installation is dangerous.
Connect and operate the machine only in accordance with the specifications on the rating plate.
Connect the machine to a power supply with alternating current only via a properly installed socket with grounding.
Please ensure that the socket where the machine will be connected has sufficient power for the correct use of it.
Never equip the machine with an external switching device, e.g., a timer or remote control.
When installing the machine, check that the power cable is not trapped or damaged.
Select the fuse according to the fuse safety identification requirements.
The power plug must be chosen to match the socket. Ensure that the machine is properly grounded.

§ The presence of damaged insulation on the power cord poses a hazard.
Never let the power cord meet hot machine parts or heat sources.
Never let the power cord meet sharp points or edges.
Never kink, crush or modify the power cord.
§ If touching the DF Wash shells reveals an electrostatic inductance, when the machine is energized, that indicates the DF Wash is not well grounded. Please stop the machine and repair the power connection immediately to ensure a good grounding.
§ Do not connect the power supply with wet hands.

§ If you have any questions, please consult a professional electrician.
WARNING ‒ Risk of Fire!
§ It is dangerous to use an extended power cord and non-approved adapters.
Do not use extension cables or multiple socket strips.
If the power cord is too short, contact Customer Service.
Only use adapters approved by the manufacturer.
WARNING ‒ Risk of Suffocation!
§ Children may put packaging material over their heads or wrap themselves up in it and suffocate.
Keep packaging material away from children.
Do not let children play with packaging material.
CAUTION ‒ Risk of Chemicals!
§ Liquid photosensitive resin: inhalation, ingestion and direct contact may cause respiratory tract infection, digestive tract infection and allergic reaction.
Please wash the photosensitive resin models in a well-ventilated environment.
Please wear personal protective equipment (such as gas masks, gloves, and goggles) during the process of cleaning the photosensitive resin models
§ Cleaning solvent: using isopropyl alcohol (IPA) as cleaning solvent can pose safety and health hazards if not used properly.
Please obtain safety instructions and guidance from the cleaning solvent supplier and follow the safety instructions for use.
Please use the flammable cleaning solvent in a ventilated environment away from open flames, heat sources, or sparks.
If inhaled or in contact with cleaning solvent for a long time, it may cause certain harm to the human respiratory system, visual system, nervous system, digestive system, and skin, etc.
If you need to contact the cleaning solvent, be sure to wear the personal protective equipment to avoid irritation to the body.
CAUTION ‒ Risk of Injury!
§ Lifting the machine, due to its high weight, may lead to injury.
Do not lift the machine on your own.
§ The machine may vibrate when in use.
Place the machine on a clean, even, solid surface.
§ If tubes and power cords have been laid incorrectly, this causes a tripping hazard.
Lay tubes and power cords in such a way that there is no risk of tripping.
§ If the machine is moved by holding onto protruding components, such as the machine door, the parts may break off.
Do not move the device by holding onto protruding parts.
CAUTION ‒ Risk of Cutting!
§ Touching sharp edges on the machine may lead to cuts.
Do not touch the sharp edges on the machine.
Wear protective gloves when installing and transporting the machine.
Safe Use
Follow these safety instructions when using the machine.
Warning - Risk of Flammability!
§ Improper use of cleaning solvent is dangerous.
Cleaning solvent is isopropyl alcohol (IPA), which belongs to flammable liquids.
Various open flames, heat sources, or sparks are strictly prohibited after the cleaning solvent is unsealed or during its use.
§ The volatilization of the flammable cleaning solvent is very dangerous during the equipment use.
Please operate the equipment in a ventilated and dry environment.
Do not open the top cover of the equipment during use.
Various open flames, heat sources, or sparks are strictly prohibited during the use of the equipment.
Clean up unnecessary flammable and combustible materials around the equipment.
Fire extinguishers should be equipped in the room where the machine is located.
WARNING - Risk of Electric Shock!
§ If the machine or the power cord is damaged, this is dangerous.
Never operate a damaged machine.
Never pull on the power cord to unplug the machine. Always unplug the machine at the mains.
If the machine or the power cord is damaged, immediately unplug the power cord.
Call customer service, please refer to the Chapter of Experiencing Difficulties/Contact Information.
Repairs to the machine should only be carried out by trained specialist staff.
§ An ingress of moisture can cause an electric shock.
Never expose the machine to intense heat or humidity.
Do not use steam cleaners or sprays to clean the machine.
WARNING ‒ Risk of Suffocation!
§ Children may breathe in or swallow small parts, causing them to suffocate.
Keep small parts away from children.
Do not let children play with small parts.
CAUTION ‒ Risk of Injury!
§ The covering plate may break if you stand on or climb onto the machine.
Do not stand on or climb onto the machine.
§ The machine may tip over if you sit on or lean against the open door.
Do not sit on or lean against the machine door.
Do not place any objects on the machine door.
§ Reaching into the chamber while the Z-axis system is still moving may cause hand injuries.
Wait for the Z-axis system to come to a complete stop before reaching inside.
§ Some parts in the equipment are sharp and may cause injury.
Do not touch the sharp edges of equipment parts.
CAUTION ‒ Risk of Chemicals!
§ Safety of liquid photosensitive resin: inhalation, ingestion and direct contact may cause respiratory tract infection, digestive tract infection and allergic reaction.
Do not ingest liquid or solid resin. If accidentally swallowed, immediately call the poison control center or a medical professional.
When handling liquid resin, resin coating surfaces, or solvent, please wear gloves. If the skin comes into contact with liquid resin, it should be rinsed thoroughly with plenty of soap and water.
§ Safety of resin disposal:
The disposal method for liquid resin is to dispose of it in a chemical waste dump or to discard it as household waste after it has been completely solidified. Do not pour liquid or partially solidified resin or solvent into the sewer or dispose of them with household waste. Properly handling resin can prevent harm to the environment and public health.
§ Safety of cleaning solvent: using isopropyl alcohol (IPA) as cleaning solvent can pose safety and health hazards if not used properly.
Please obtain safety instructions and guidance from the cleaning solvent supplier and follow the safety instructions for use.
Please use the flammable cleaning solvent in a ventilated environment away from open flames, heat sources, or sparks.
Cleaning solvent can evaporate into the air after unsealing or during use. Please use the equipment in a well-ventilated area and wear personal protective equipment. Otherwise, excessive inhalation of cleaning solvent may pose a threat to human health.
According to local regulations, IPA may be difficult to purchase or use in buildings.
Safe Maintenance
Take note of the safety instructions when performing maintenance work on the machine.
WARNING - Risk of Electric Shock!
§ Improper repairs are dangerous.
Repairs to the machine should only be carried out by trained specialist staff.
Only use the manufacturer's original spare parts and original accessories when repairing the machine.
If the power cord of this machine is damaged, it must be replaced by the manufacturer, the manufacturer's Customer Service or a similarly qualified person in order to prevent any risk.
§ An ingress of moisture can cause an electric shock.
Do not use steam cleaners or sprays to clean the machine.
WARNING ‒ Risk of Injury!
§ The use of non-original spare parts and non-original accessories is dangerous.
Only use the manufacturer's original spare parts and original accessories.
Moving Parts: Do not put fingers, clothing or hair into gears and other hazardous parts to avoid electric shock, injury, fire, or damage to the device.

High Voltage: The high voltage sign indicates the presence of high voltages. Always stay away from exposed circuitry. It is recommended that all conductors be removed.

Protective Earthing Conductor Terminal: Marked near the protective earthing conductor terminal.

Flammable Liquids and Gases: Cleaning solvent is isopropyl alcohol (IPA), which belongs to flammable liquids. Please keep away from various open flames, heat sources, or sparks during use or storage.

FCC Statement
Please be aware that changes or modification not expressly approved by the party responsible for compliance could void the user’s authority to operate the equipment.
This device complies with Part 15 of the FCC Rules. Operation is subject to the following two conditions:
(1) This device may not cause harmful interference, and
(2) This device must accept any interference received, including interference that may cause undesired operation.
This equipment complies with FCC radiation exposure limits set forth for an uncontrolled environment. This equipment should be installed and operated with minimum distance 20cm between the radiator & your body.
IC Caution
The device meets the exemption from the routine evaluation limits in section 2.5 of RSS 102 and compliance with RSS-102 RF exposure, users can obtain Canadian information on RF exposure and compliance.
This device contains license-exempt transmitter(s)/receiver(s) that comply with Innovation, Science and Economic Development Canada’s license-exempt RSS(s). Operation is subject to the following two conditions:
(1) This device may not cause interference.
(2) This device must accept any interference, including interference that may cause undesired operation of the device.
This equipment should be installed and operated with a minimum distance of 20 cm between the radiator and your body.
Le dispositif rencontre l'exemption des limites courantes d'évaluation dans la section 2.5 de RSS102 et la conformité à l'expostion de RSS-102 rf, utilisateurs peut obtenir l'information canadienne sur l'exposition et la conformité de rf.
L’émetteur/récepteur exempt de licence contenu dans le présent appareil est conforme aux CNR d’Innovation, Sciences et Développement économique Canada applicables aux appareils radio exempts de licence. L’exploitation est autorisée aux deux conditions suivantes:
(1) L’appareil ne doit pas produire de brouillage;
(2) L’appareil doit accepter tout brouillage radioélectrique subi, même si le brouillage est susceptible d’en compromettre le fonctionne.
Cet équipement doit être installé et utilisé à une distance minimale de 20 cm entre le radiateur et votre corps.
EU Conformity Statement
| This product and-if applicable-the supplied accessories too are marked with “CE” and comply therefore with the applicable harmonized European standards listed under the RE Directive 2014/53/EU, the EMC Directive 2014/30/EU, the LVD Directive 2014/35/EU, the RoHS Directive 2011/65/EU, the MD Directive 2006/42/EC. |
| 2012/19/EU (WEEE directive): Products marked with this symbol cannot be disposed of as unsorted municipal waste in the European Union. For proper recycling, return this product to your local supplier upon the purchase of equivalent new equipment, or dispose of it at designated collection points. For more information see: http://www.recyclethis.info. |
| 2006/66/EC (battery directive): This product contains a battery that cannot be disposed of as unsorted municipal waste in the European Union. See the product documentation for specific battery information. The battery is marked with this symbol, which may include lettering to indicate cadmium (Cd), lead (Pb), or mercury (Hg). For proper recycling, return the battery to your supplier or to a designated collection point. For more information see: http://www.recyclethis.info. |
UKCA Conformity Statement
| This product is marked with "UKCA" and in conformity with the relevant UK statutory requirement: Radio Equipment Regulations 2017. The full text of the UK declaration of conformity is available at https://www.raise3d.com. |
UK sales partner company name: 3DGBIRE Ltd UK sales partner company address: 3DGBIRE, Unit 44/45 Chorley North Industrial Estate, Drumhead Road, Chorley, Lancashire, PR67BX | |
Electromagnetic Compatibility - EMC
Simplified EU Declaration of Conformity
Raise3D declares that this device is in compliance with the essential requirements and other relevant provisions of Directive 2014/53/EU. Full text of the EU declaration of conformity is available at https://www.raise3d.com.
RF Exposure Information
This device has been tested and meets applicable limits for Radio Frequency (RF) exposure.
This equipment must be installed and operated in accordance with provided instructions and the antenna(s) used for this transmitter must be installed to provide a separation distance of at least 20 cm from all persons and must be co-located or operating in conjunction with any other antenna or transmitter.
CE&UKCA Mark Warning
The device is restricted to indoor use only when operating in the 5150 to 5250 MHz frequency range.

| BE | EE | HR | IT | CY | LV | LT |
BG | IE | LU | HU | MT | NL | AT | |
CZ | EL | PL | PT | RO | SI | SK | |
DK | ES | FI | SE | DE | FR | LI | |
NO | IS | CH | TR | UK(NI) | UK |
|
Installation
To facilitate operation and maintenance, maintain a proper clearance of 30 cm (11.9 in) on the side of the machine, 40 cm (15.8 in) at the front, 40 cm (15.8 in) at the back, and 60 cm (23.7 in) on top during installation. No flammable materials are allowed around the installation location, where is a well-ventilated environment away from various open flames, heat sources, or sparks.
Note: During low-temperature transportation, the machine may encounter frost or icing hazards. The machine should be stored at room temperature for 4-6 hours before operating.
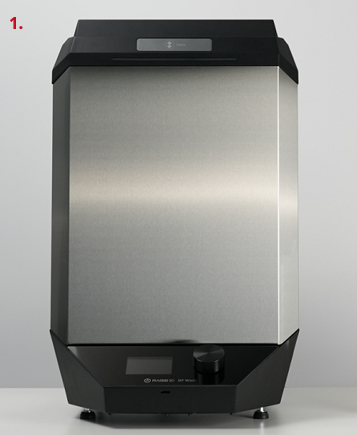
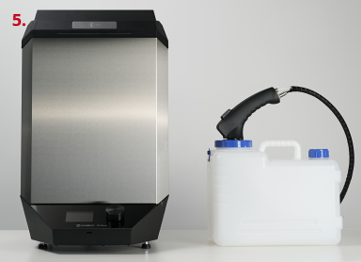
B.1 DF Wash Product Introduction
The Raise3D DF Wash (hereinafter referred to as "DF Wash") is a post-processing washing machine, an accessory for the DF2 3D printer (hereinafter referred to as "DF2"). The DF Wash is compatible with models printed by the DF2, so there is no need to remove the models from the DF2 smart build platform nor to contact the resin. DF Wash has two washing modes: models in the washing basket and models hung on the RFID smart build platform. The DF Wash is closed during washing, which can effectively prevent the cleaning solvent from splashing or volatilizing so as to provide more safety.
B.2 Technical Specification
ITEM | DF Wash | |
CONSTRUCTION | Maximum Washing Size (W×D×H) | 200 mm x 112 mm x 300 mm (7.9 in x 4.4 in x 11.8 in) |
DF Wash Size (W×D×H) | 400 mm x 410 mm x 646mm (15.7 in x 16.1 in x 25.4 in) | |
ELECTRICAL | Power Supply Input | 100-240 VAC, 50/60 Hz, 2.5 A Max |
Power Supply Output | 24 V, 4 A, 96 W | |
GENERAL | Operating Ambient Temperature | 10 °C - 35 °C, 10-90% RH, Non-Condensing |
Storage Temperature | -25 °C to +55 °C, 10-90% RH, Non-Condensing | |
Operating Noise | ≤55 db | |
Suitable Printer | DF2 | |
Washing Bucket Volume | 14 L | |
Suitable Solvent | IPA | |
DF WASH CONTROL | Screen Resolution | 320×480 |
Motion Controller | HR4988/TMC2160A-TA | |
Logic Controller | T5L0 | |
OS | DGUS II (Embedded) | |
Ports | TF Card Slot | |
B.3 Main Parts
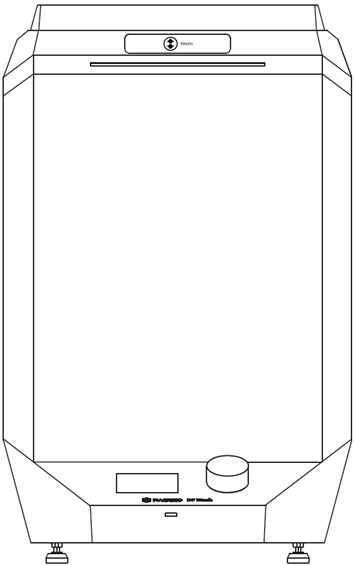
Front View
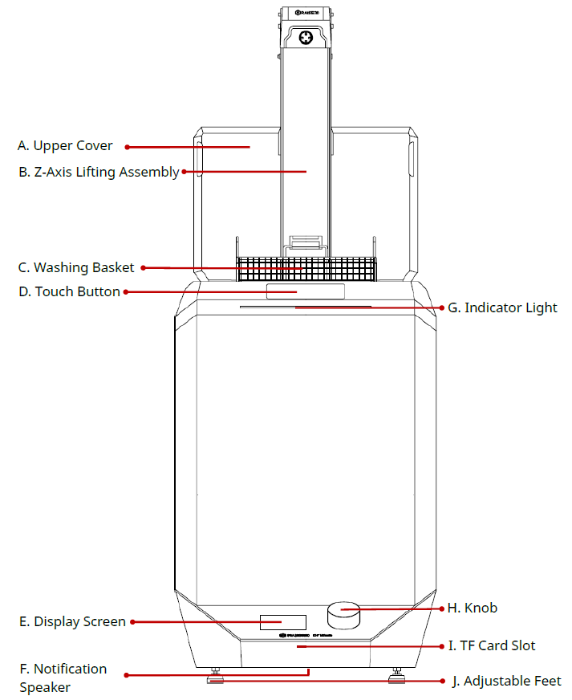
A. Upper Cover
The upper cover of the main body automatically opens as the Z-axis rises and closes as the Z-axis lowers.
B. Z-Axis Lifting Assembly
The Z-axis lifting assembly can ascend and descend with the smart build platform and the washing basket on it.
C. Washing Basket
It can be hung on the Z-axis with models in it for washing and drying.
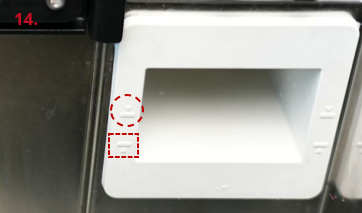
D. Touch Button
Tapping the touch button controls the raising, lowering, and pause operations of the Z-axis. Double-tapping the touch button changes the travelling direction on the Z-axis.
E. Display Screen
A 3.5-inch non-touch resistive screen display for user interaction information.
F. Notification Speaker
Emits a sound to remind the user of the washing status.
G. Indicator Light
It indicates the status for the DF Wash. Green indicates the standby status or the completion of washing; blue indicates the DF Wash is in operation; red indicates abnormal status.
H. Knob
It’s used to select, set and control the user interface information on the display screen.
I. TF Card Slot
Insert a TF card to update the printer’s firmware.
J. Adjustable Feet
Supports the DF Wash and adjusts the level of its placement.
Side View

K. Washing Barrel
The printed models are immersed into this washing barrel through the Z-axis lifting assembly for washing.
L. Anti-Pinch Sensing Area
When hands or objects are in this area, the Z-axis will not perform the falling operation and the upper cover will not close to prevent hands or objects from getting caught.
M. RFID Sensor
Uses RFID tags and readers for models’ information transmission and identification between the DF Wash and the DF2.
N. Overflow Boxes
Senses the level of cleaning solvent in the washing barrel and stores excess cleaning solvent. The overflow boxes are marked with minimum and maximum liquid level graduation lines. After the washing starts, Z-axis will lower itself into the washing barrel, and DF Wash will automatically check the liquid level. If the cleaning solvent exceeds the maximum liquid level mark, DF Wash will automatically discharge the cleaning solvent into the waste container.
O. Air Outlets
After the model washing is completed, the Z-axis rises to the top, and the smart build platform or the washing basket detaches from the cleaning solvent. At this time, the air outlets blow dry the models on the smart build platform or inside the washing basket.
Back View
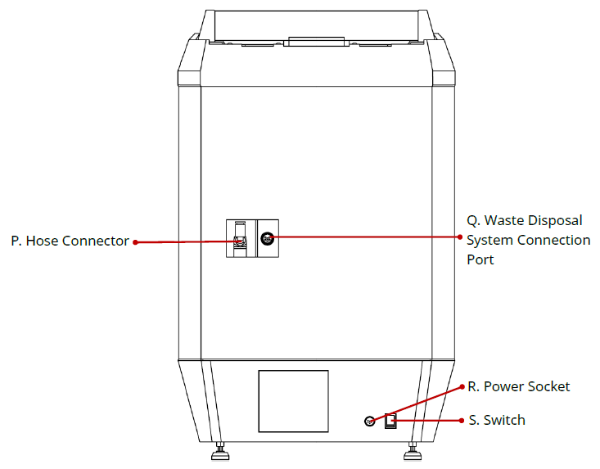
P. Hose Connector
Connects the hose from the waste disposal system to drain the cleaning solvent from the washing barrel to the waste container.
Q. Waste Disposal System Connection Port
Connects to the connection cable from the waste disposal system to transmit power and signal.
R. Power Socket
Plug in the power cord to start the DF Wash.
S. Switch
Power switch to turn the DF Wash on or off.
B.4 Accessories List
Item | Name | Purpose | Quantity | Unit |
1 | Waste Disposal System (including: Drain Tool, Hose and Signal Cable) | Used to drain the waste cleaning solvent from the washing barrel | 1 | Set |
2 | Waste Container | Contains waste cleaning solvent discharged from the washing barrel | 1 | Piece |
3 | Waste Container Functional Cap | Fixes the drain tool on the waste container | 1 | Piece |
4 | Hydrometer | Measures the density of the cleaning solvent to determine if it still can be used for washing | 1 | Piece |
5 | Power Cord and Adapter (meet local standards) | Provides the DF Wash with electricity | 1 | Piece |
6 | Electric Siphon Pump (including two D-size batteries) | Adds cleaning solvent to the washing barrel | 1 | Piece |
7 | Firmware Upgrade Kit (including: a TF Card, a Micro SD Card Adapter, and a TF Card Extension Adapter) | Upgrades the firmware | 1 | Set |
C.1 Place the DF Wash
After unpacking, please place the DF Wash on a stable, well-ventilated and dry area, with no open flames closeby.
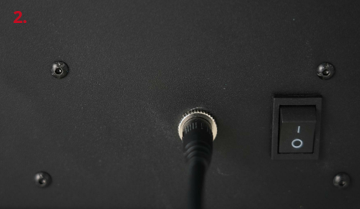
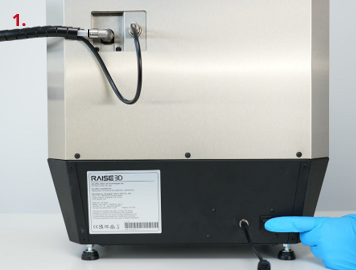
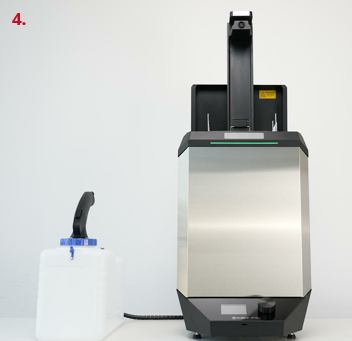
C.2 Connect Power Cord
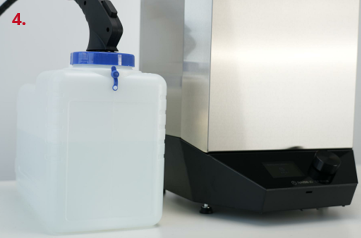
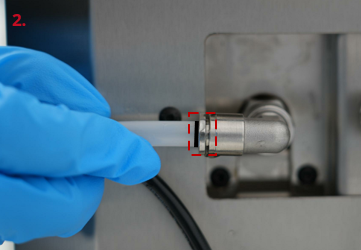
Connect one end of the power cord to the power adapter, connect the power cord on the power adapter to the power socket on the back of the DF Wash (as shown in figure 2), and the other end of the power cord to a grounded outlet.

C.3 Assemble the Waste Container and the Waste Disposal System
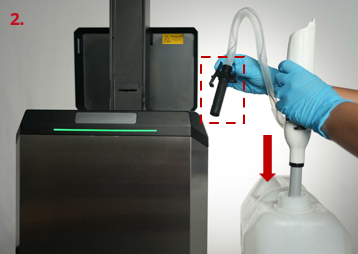
After placing the waste container next to the DF Wash, replace its original cap with the waste container functional cap.
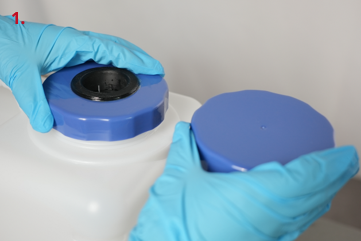
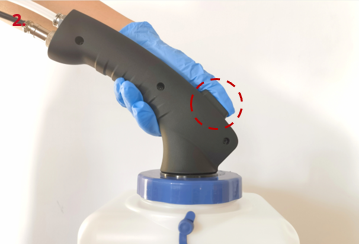
As shown in the red circle in figure 2, press and hold the button of the drain tool, insert the head of the drain tool (including one end of the hose and the liquid level detection needle) into the waste container functional cap, and then place it inside the waste container. If the drain tool does not come out after releasing the button, it indicates that the drain tool is stuck.
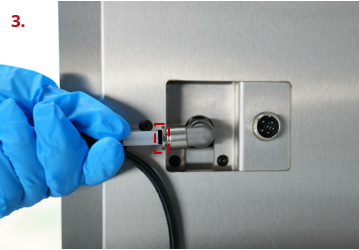
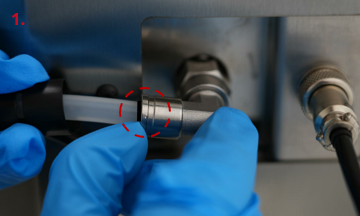
Insert the other end of the hose from the tail of the drain tool directly into the hose connector on the back of the DF Wash. It is important to verify that the hose is fully secured by carefully attempting to pull the hose free from the connector without depressing the locking ring. If the hose cannot be pulled out, and the black scale line (as shown in the red box in figure 3) on the hose is tightly closed and up against the locking ring, it is in place.
Insert the signal cable from the rear of the drain tool into the waste disposal system connection port on the back of the DF Wash, and tighten it.
Note: The notches on the connector need to be aligned.

The assembly of the DF Wash, the waste container and the waste disposal system is complete.
C.4 Start the DF Wash
Use the switch to power on the DF Wash.
Tap the touch button. The upper cover will open, and the Z-axis lifting assembly will rise to the top.
Note: Tapping the touch button controls the raising, lowering, and pause operations of the Z-axis. Double-tapping the touch button changes the travelling direction on the Z-axis.
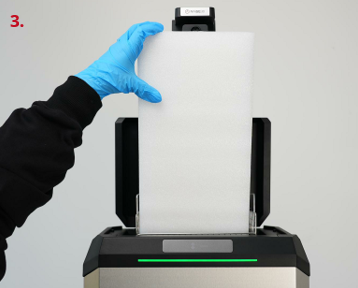
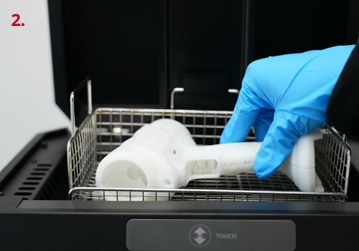
Remove the foam from the washing basket. The DF Wash startup is complete.
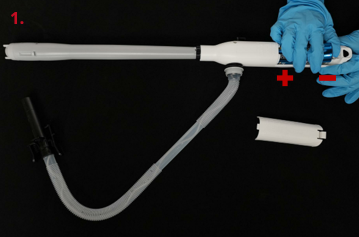
C.5 Install the Electric Siphon Pump
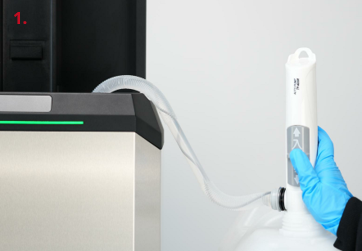
Install the two D-size batteries into the battery compartment of the electric siphon pump as shown in figure 1.
After removing the washing basket from the Z-axis lifting assembly, insert the inlet end of the electric siphon pump into the cleaning solvent container with one hand, as shown in figure 2, and put the outlet end (the black part) of the electric siphon pump into the washing barrel with the other hand.
This chapter introduces the basic operation of the DF Wash display screen interface. The current display interface only supports English.
D.1 Display Interface
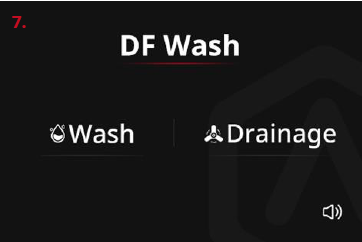
After turning on the DF Wash, the display screen jumps to the home page, which has two options: Wash and Drainage.

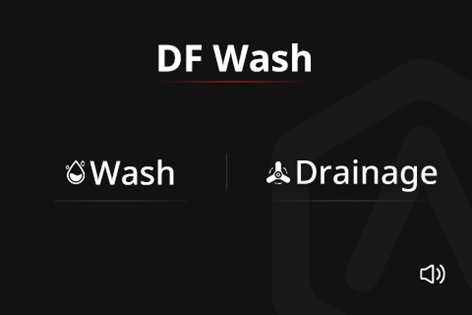
Select an option by turning the knob, and the selected option will be displayed in red (as shown in the following left figure). Pressing the knob indicates confirmation and enters the corresponding interface.  indicates returning to the home page, and when selected, it appears in red.
  indicates confirmation, and when selected, it appears in green (as shown in the following figure).

Rotate the knob to highlight the speaker icon in the lower-right corner of the home page, and press the knob to toggle the DF Wash prompt sound. The icon  indicates that the prompt sound is turned on, and the icon
  indicates that the prompt sound is turned off.
Note: Only the prompt sound during operation will be affected; the DF Wash startup prompt sound cannot be turned off.
Please refer to Chapter E for specific user interface instructions.
D.2 Update Firmware
Raise3D will send you a notification when a firmware update for DF Wash becomes available. After receiving this notification, please use the included Firmware Upgrade Kit to update the firmware for DF Wash.
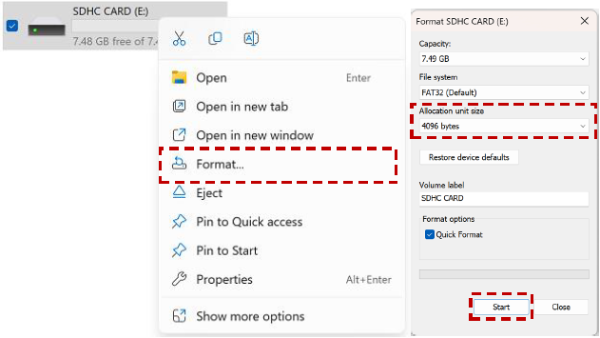
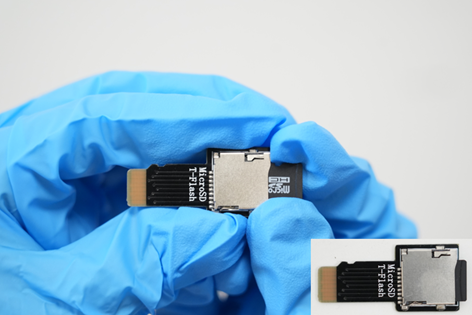
1. As exampled in the red circle in the following figure, ensure that the sliding switch of the Micro SD card adapter is in an unlocked state. Insert the TF card into the Micro SD card adapter, and then insert the Micro SD card adapter into the computer.

2. Find the folder where the Micro SD card adapter is located, and right-click the mouse to select Format. Select 4096 bytes from the drop-down list of the Allocation Unit Size, click Start, and then follow the prompts on the screen to complete the format.
Notes:
a. If the allocation unit of the TF card is not set to 4096 bytes, the subsequent firmware update will fail.
b. It is recommended to format the TF card three times (continuously) before proceeding to prevent the TF card from not being fully formatted.
3. According to the information in the notification, download the latest DF Wash firmware and place the firmware upgrade files into the root directory of the formatted TF card.
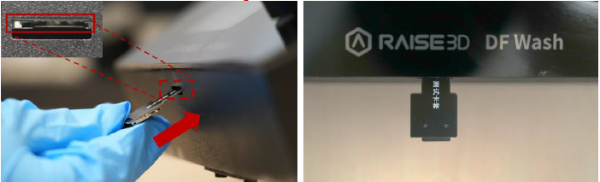
4. Safely eject the TF card, with the new firmware, from the Micro SD card adapter and insert it into the TF card extension adapter. When you hear a "click" sound, it indicates that it is properly mounted
5. Turn off the DF Wash.
6. Locate the TF card slot, as shown in the red box in the following figure, and mount the TF card extension adapter into the TF card slot along the insertion angle indicated by the red arrow.
Note: When inserting the TF card extension adapter, it is important to slightly angle it upwards (shown below). The TF card extension adapter can not be inserted parallel to the flat surface the DF Wash is sitting on.
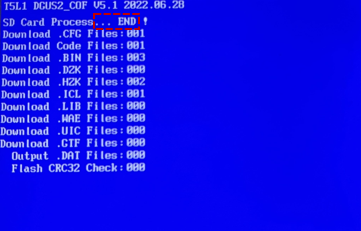
7. Turn on the DF Wash, and the firmware will be updated automatically. When … END appears, the firmware updating is complete.
Note: If the screen does not display the interface shown in the following figure, and it shows a blue or black screen, please return to Step 2 (reformatting the TF card) and follow the subsequent steps to upgrade the firmware.
8. Turn off the DF Wash again, pull out the TF card extension adapter and restart the DF Wash. If the firmware version V:x.xx. xxxx displayed on the home page is consistent with the version in the firmware upgrade compressed folder name, the DF Wash firmware update is complete.
E.1 Fill Cleaning Solvent
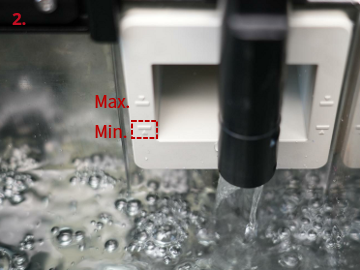
Push the electric siphon pump switch upwards to turn it on so that the electric siphon pump will automatically pump the cleaning solvent from the container into the washing barrel. When the liquid level reaches the minimum liquid level mark on the overflow box (as shown in the red box in figure 2), the electric siphon pump will automatically stop filling the cleaning solvent. Pushing the electric siphon pump switch downwards will turn off the pump.
Note: It is not recommended to manually pour the cleaning solvent into the DF Wash as it may cause damage to sensitive components.
E.2 Select One Washing Mode
RFID Smart Build Platform Mode: Insert the RFID smart build platform with models on it into the fixed bracket on the Z-axis lifting assembly for washing.

Washing Basket Mode: Place models in the washing basket for washing.
Notes:
1. Remove the outlet end of the electric siphon pump from the DF Wash first, and then select a washing mode.
2. After removing the electric siphon pump from the DF Wash, please make sure to wipe off the cleaning solvent on its surface shortly after to ensure that the outlet end (the black part) remains dry.
E.3 Wash and Dry Models
RFID Smart Build Platform Mode:
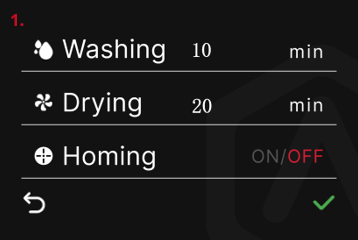
After inserting the smart build platform with models into the fixed bracket on the Z-axis, the system will automatically read the parameters set in the RFID smart build platform (including washing time and drying time), and display them on the display screen (as shown in figure 1).
After pressing the green √, the Z-axis with the smart build platform will lower itself into the washing barrel, and DF Wash will automatically perform washing and drying operations according to the parameters in RFID.
If you want to adjust the parameters set in RFID, you can turn the knob to select the parameters to be adjusted and set them. Please refer to the washing basket mode for details in the following text.
Washing Basket Mode:
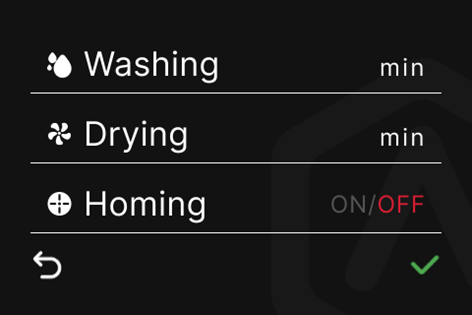
Turn the knob from the home page to the Wash option, press the knob to enter the washing interface.
As the letters in red indicate in figure 3, Washing has been selected.
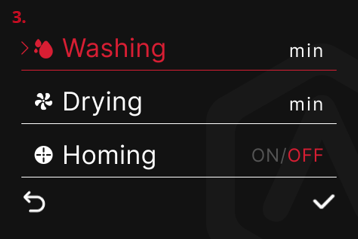
Press the knob to enter the Washing option and turn the knob to adjust the time for this parameter, with a time range from 0 to 30 minutes.

After adjusting, press the knob to return to the previous level. Turn the knob to select Drying.
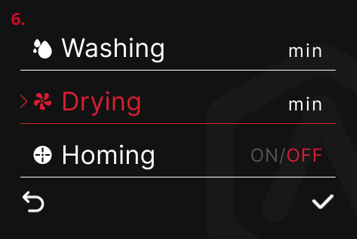
Press the knob to enter the Drying option and turn the knob to adjust the time for this parameter, with a time range from 0 to 30 minutes.
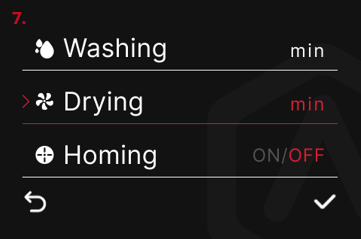
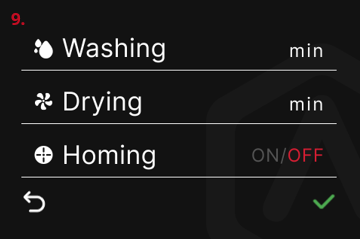
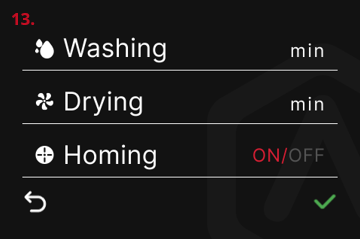
After adjusting, press the knob to return to the previous level. Turn the knob to select √, and press the knob. The DF Wash is ready to start washing.
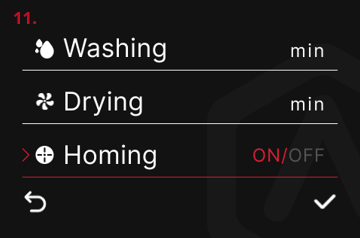
Note: There is a Homing function on the washing interface. This function is disabled (OFF) by default. With this function enabled, if the DF Wash is in standby mode for 30 minutes, the Z-axis will automatically descend to its original position, and the upper cover will be closed to prevent the cleaning solvent from evaporating.
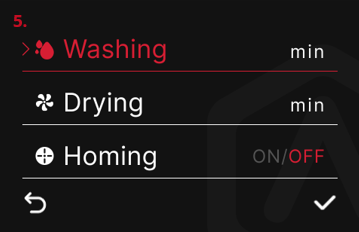
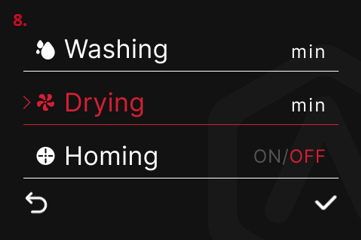
To enable the Homing function, you can turn the knob on the washing interface and select Homing.
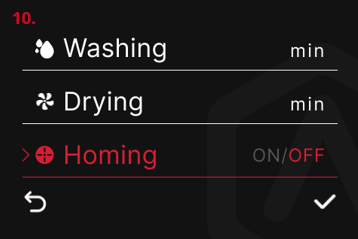
Press the knob to enter the Homing option and turn the knob to switch to ON. Press the knob to return to the previous level. Turn the knob to select √, and press the knob. To enable Homing function is complete.

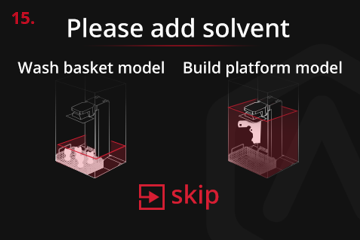
Before the DF Wash begins, if the cleaning solvent does not reach the minimum liquid level shown in the red box in figure 14, the display screen will prompt Please add solvent. After adding cleaning solvent above the minimum liquid level, the DF Wash will continue the washing operation. If you need to ignore this prompt, you can press Skip to jump to the washing interface and continue the washing operation.
Note: If the model is washed on the smart build platform, it is recommended to fill the cleaning solvent above the minimum liquid level to wash the model. If the model is washed in the washing basket, it’s sufficient for the cleaning solvent to just immerse the model (at least 4 liters of cleaning solvent).
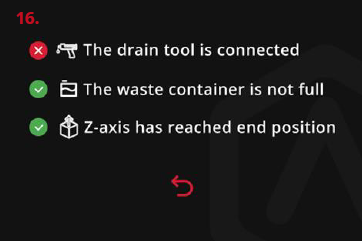
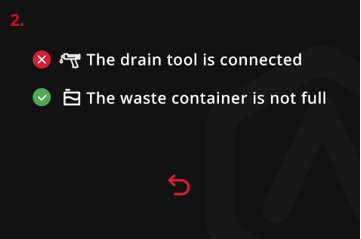
The DF Wash automatically detects 3 washing conditions. If there are any abnormalities, as shown in figure 16 and figure 17, please check:
Whether the head of the drain tool is inserted into the waste container functional cap and has been fully inserted.
Whether the signal cable in the waste disposal system is properly connected to the DF Wash.
Whether the signal cable in the waste disposal system is properly connected to the tail of the drain tool.
Whether the liquid in the waste container is full, and whether the waste container has to be replaced or whether the liquid in it needs to be poured out.
After the abnormality is resolved, the red cross will automatically turn into a green tick. If you need to return to the home page, you can press the red  .
.

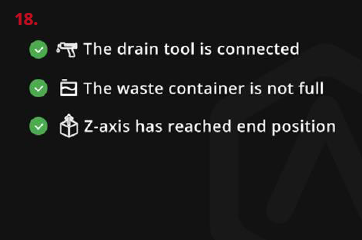
When the 3 washing conditions are met, the display screen will show what is illustrated in figure 18, and at the same time, the Z-axis will begin to lower, and the upper cover will begin to close. When the Z-axis reaches the end position and the upper cover is fully closed, the DF Wash will begin washing the model.
During the Z-axis lowering process, if the cleaning solvent exceeds the maximum liquid level on the overflow box (as shown in the red circle in figure 14) as the model is immersed into the cleaning solvent, the DF Wash will automatically drain the liquid. After the excess cleaning solvent is drained into the waste container, the DF Wash will continue the washing operation.
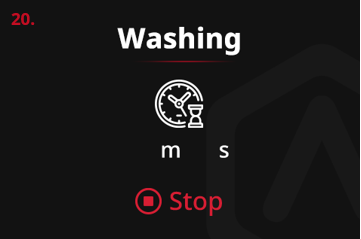
As the DF Wash starts the washing operation, the Washing interface is displayed. The position shown in the red box in figure 19 shows the remaining washing time.
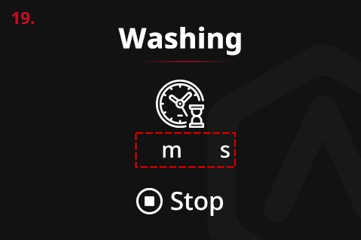
If you want to stop washing during the washing process, you can turn the knob to select the Stop and press the knob to return to the home page.
Note: After pressing the Stop, washing cannot be resumed. If washing is still required, the washing process can be restarted.
When washing is finished, the Z-axis will rise from the washing barrel. When the Z-axis reaches the end position, the fans will start working to blow dry the model.

The Blow Drying interface is displayed. The position shown in the red box in figure 22 shows the remaining drying time.

If you want to stop drying during the drying process, you can turn the knob to select the Stop and press the knob to return to the home page.
Note: After pressing the Stop, drying cannot be resumed. If drying is still required, the drying process can be restarted.

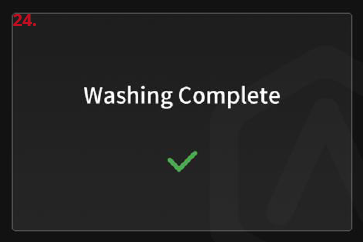
When drying is finished, Washing Complete will be displayed, indicating that the entire washing process is complete. DF Wash will emit a prompt sound and will stop working. Press the green √ to return to the home page.
The model can be removed from the washing basket.
E.4 Drain the Cleaning Solvent
Turn the knob to the Drainage option from the home page, press the knob, and the DF Wash is ready to start draining.

The DF Wash automatically detects 2 draining conditions. If there are any abnormalities, as shown in figure 2 and figure 3, please check:
Whether the head of the drain tool is inserted into the waste container functional cap and has been fully inserted.
Whether the signal cable in the waste disposal system is properly connected to the DF Wash.
Whether the signal cable in the waste disposal system is properly connected to the tail of the drain tool.
Whether the liquid in the waste container is full, and whether it is needed to replace the waste container or pour out the liquid in it.
After the abnormality is resolved, the red cross will automatically turn into a green tick. If you need to return to the home page, you can press the red  .
.

When the 2 draining conditions are met, the DF Wash begins to drain the used cleaning solvent into the waste container.
The display screen enters the drainage interface and displays Draining Solvent. The position shown in the red box in figure 5 displays the remaining time for drainage (fixed setting as 5 minutes for drainage).
If you want to stop draining during the drainage process, you can press the red  to return to the home page.
Note: After pressing the red  , drainage cannot be resumed. If drainage is still required, the drainage process can be restarted.
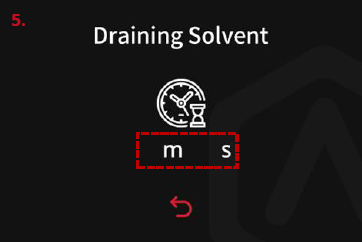
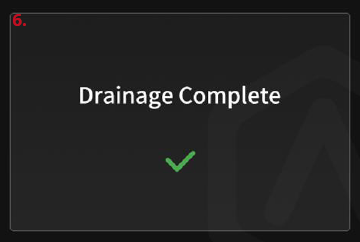
When all the cleaning solvent in the washing barrel is drained out, Drainage Complete is displayed. DF Wash will emit a prompt sound and will stop working. Press the green √ to return to the home page.
F.1 Replace the Cleaning Solvent
When the cleaning solvent is used multiple times, it eventually becomes muddy. Additonally, the cleaning solvent can easily adsorb dust due to exposure to the air for a long time. Therefore, it is necessary to regularly measure the density for the cleaning solvent with a hydrometer to determine whether it is necessary to replace the cleaning solvent, in order to be more effective for model washing.
1. Maintenance Frequency: once a week.
2. Operation Steps:
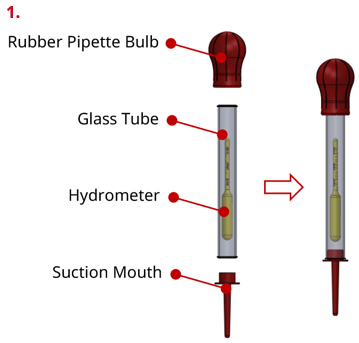
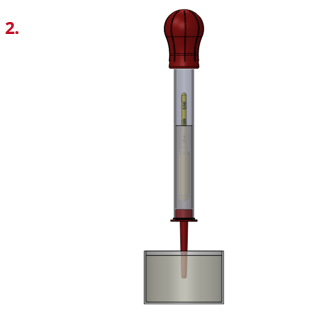
A. Assemble the hydrometer:
1) Place the hydrometer into a glass tube.
2) Install the rubber pipette bulb and the suction mouth onto both ends of the glass tube
Note: The graduated section of the hydrometer is nearer the rubber pipette bulb.
B. The DF Wash is in standby mode.
C. Use a hydrometer to measure the density for the cleaning solvent in the washing barrel:
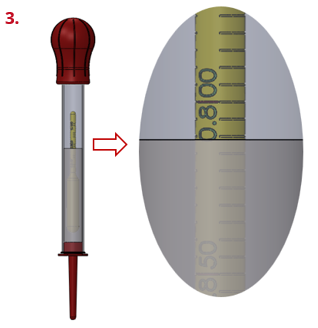
1) As shown in figure 2, first flatten the rubber pipette bulb on the hydrometer, then place the suction mouth vertically in the cleaning solvent, slowly release the fingers on the rubber pipette bulb, and suck the liquid into the glass tube. The liquid absorbed should not be too much or too little, and the upper and lower ends of the hydrometer should be completely suspended.
2) As shown in figure 3, place the hydrometer vertically with the line of sight at the same horizontal position as the surface of the measured liquid. The hydrometer scale which the current liquid level reaches is the specific density of the measured liquid, and the scale value is read. The range of the hydrometer is 0.75~0.85. When the density of the cleaning solvent is ≥ 0.82, it is recommended to replace the cleaning solvent.
3) After the measurement is completed, pinch and squeeze the rubber pipette bulb multiple times to drain the cleaning solvent from the hydrometer, and clean the hydrometer with clean cleaning solvent. Properly store the hydrometer for future use.
D. If the cleaning solvent needs to be replaced based on the measurement result of the hydrometer, refer to section E.4 to drain the cleaning solvent from the washing barrel into the waste container.
E. Refer to section E.1 to fill the new cleaning solvent to the washing barrel. The cleaning solvent replacement has been completed.
F.2 Clean the Surface
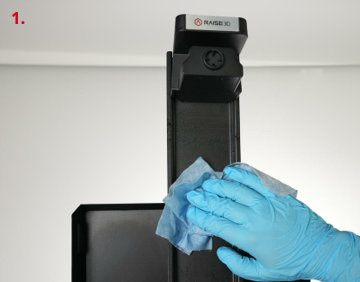
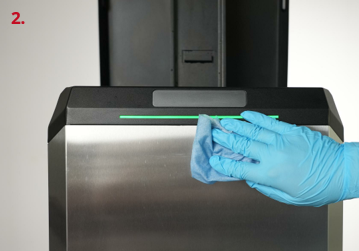
After each use there will be residual cleaning solvent on the surface of the DF Wash. It is recommended to clean its surface with a piece of lint-free cloth.
1. Maintenance Frequency: after each use.
2. Operation Steps:
A. The DF Wash is in standby mode.
B. Wipe the cleaning solvent on the Z-axis lifting assembly and the surface of the DF Wash with a piece of lint-free cloth.
F.3 Check for the Leakage at the Hose Connector
Frequent use of the DF Wash may cause looseness in the hose connector, causing the cleaning solvent to drip. Therefore, it is necessary to regularly check the hose connector for leakage.
1. Maintenance Frequency: once a month.
2. Operation Steps:
A. The DF Wash is in the working state of drainage.
B. Visually check the hose connector on the back of the DF Wash for any liquid leakage.
C. If liquid dripping is found at the hose connector, try inserting the hose tightly into the quick connector to observe if there is still any liquid dripping.
D. If there is still liquid leakage, wait for all cleaning solvent to be drained into the waste container, and the DF Wash is in standby mode. Then, as shown in the red circle in figure 1, move the locking ring to the right to closer to the nut of the quick connector, and then pull out the hose.
E. Reinsert the hose into the hose connector and pull it outward after fully inserting it. If the hose cannot be pulled out, and the black scale line on the hose is tightly closed and up against the locking ring (as shown in the red box in figure 2), it’s in place.
F. After adding a small amount of cleaning solvent to the washing barrel, perform the drainage operation to check if there is still any liquid dripping at the hose connector. If there is still any leakage, please contact your local after-sales service center or dealer.
If you run into any issues during this guided setup, please contact our expert technicians by creating a ticket online at https://help.raise3d.com/support/home/.For customers outside the United States, please contact your local Raise3D reseller or distributor.
For sales inquiries, please contact us at sales@raise3d.com.
For any other inquiries, please email us at inquiry@raise3d.com.