
[ Manual Pro2 Series - 016 Bed Leveling Calibration-V1.0 ]
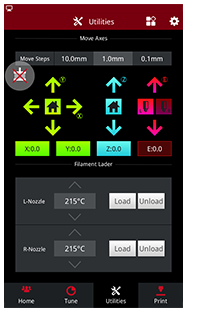
Once both homing procedures are completed, disable the motors by pressing the round icon in the top left of the screen.

Measure the distance between the nozzle tip and the build surface with a 0.2mm feeler gauge.
When properly calibrated, the feeler gauge should have friction between the bed and the nozzle without requiring excessive force. If the current position does not fit this description, refer to Manual Pro2-100 Nozzle Height Calibration

4. Move the extruder to the four corners of the build plate, and check the distances with the feeler gauge. If the feeler gauge does not mimic the feel of the center position, determine if it is too far (loose) or too close (tight).

5. Press the Z-Home button. Once the homing is completed check the distance between the nozzle tip and build plate one final time.
If moving the gantry manually, you will need to disable the motors again after the homing process.
Confirm that all 4 corners and the center of the bed offer the correct amount of resistance as depicted in step 3.
If further adjustments are required, repeat the steps until the proper position is reached.
[ Manual Pro2 Series - 016 Bed Leveling Calibration-V1.0 ]
-END-
