
When do I need to level the print bed?
The Pro3 Series printers have the print bed adjusted before delivery. It is not necessary to adjust the flatness of the print bed on a new Pro3 Series printer.
If you do anything with the print bed (e.g., replacing the silicone heating plate, manually adjusting the screws on the print bed), then you need to re-level it.
How to level the bed?
Tool:
① 2 mm hex wrench

1. Turn off the printer power.

Figure 1 Turn off the printer power.
2. Loosen the 2 thumbscrews that secure the build plate by rotating them counterclockwise.

Figure 2 Loosen 2 thumbscrews.
3. Hold the red protective handle and lift the build plate slightly. Then remove the build plate from the printer and place it on a flat work surface.

Figure 3 Remove the build plate.
4. There are 9 securing screws on the print bed. Tighten the 9 screws by turning them clockwise using a 2mm hex wrench. This step aims to home the print bed.

Figure 4 Counterclockwise tighten the 9 screws.
5. Return the build plate to the printer.

Figure 5 Put the build plate back to the printer.
6. Power on the printer, and click the "Settings" icon in the upper left corner.

Figure 6 Enter the setting page.
7. Click “Maintenance”, then select “Bed Leveling”. You will enter the bed leveling interface.
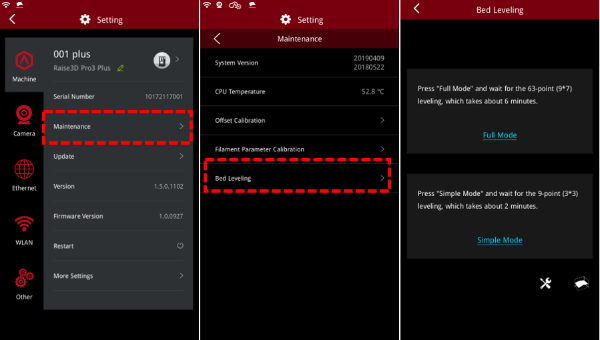
Figure 7 Enter the bed leveling interface.
Note: You can also click the “ ” icon on the menu bar of the home page to quickly enter the bed leveling interface.

Figure 8 Bed leveling shortcut.
8. Pro3 Series printers provide 2 leveling modes, Simple Mode and Full Mode. In Simple Mode, Pro3 Series printers will run a 9-point leveling to check the flatness of 9 areas on the print bed. In Full Mode, Pro3 Series printers will run a 63-point leveling. Please select the appropriate mode for your needs.

Figure 9 Two leveling models.
9. Make sure that there are not any debris on the build plate. This tutorial takes Simple Mode as an example.
1) Select "Simple Mode", and the printer will automatically start the 9-point leveling, which takes about 2 minutes. The extruder will travel to 9 areas on the build plate, and the auto-leveling assembly will detect the flatness of this area.

Figure 10 Run the Simple Mode.
10. After leveling is completed, a visualization model of the flatness will be displayed on the screen. You can switch between 2D or 3D mode to check the flatness. "Flatness" indicates the overall flatness of the print bed. If the flatness is less than or equal to (≤) 0.15, the printer can print normally. If it is greater than (>) 0.15, continue reading this tutorial to level the bed.

Figure 11 3D schematic diagram of the flatness.
11. Switch to 2D mode. The green area indicates that the corresponding position on the bed is closest to the horizontal plane. The yellow area indicates that the corresponding position on the bed is higher than the horizontal plane, and the blue area indicates that the corresponding position is lower than the horizontal plane. Click the point on the report to view the offset value in the upper left corner of the screen.

Figure 12 2D schematic diagram of the flatness.
12. Take the following figure as an example. The area shown in the figure is blue, indicating that the area is lower than the horizontal plane. The offset value at the cursor is -1.00, which means that this place is 1mm below the horizontal plane, so the bed at this point needs to be lifted.

Figure 13 The print bed at the cursor needs to be lifted.
13. Turn the screw counterclockwise at this point on the bed with a 2 mm hex wrench and the print bed will lift up. A full turn of the wrench will change the height of the print bed by 0.5mm. Please adjust the height according to the offset value at the cursor.

Figure 14 Turn the screw counterclockwise to lift the bed.
Note: Turn the screws on the print bed clockwise and the bed will drop.

Figure 15 Turn the screws on the print bed clockwise.
14. Rerun the bed leveling. If the flatness of the print bed is still greater than (>) 0.15, please repeat steps 8 to 13 to adjust the flatness until the screen shows that the flatness is suitable for printing.
15. You can click the “ ” icon to enter the setting interface. You can turn on the "Enable Mesh Data Compensation" function, the printer will automatically compensate the offset value of the print bed during printing, so that it will be closer to the level. You can also tick “Auto probe before each print” to level the bed where the model is placed.
Note: The " Auto probe before each print " function will take effect in ideaMaker 3.5.0 and above.

Figure 15 Enable Mesh Data Compensation.
16. Under the advanced settings, the Pro3 Series provides 2 functions, "Turn off leveling compensation when using Raft" and "Heat up heatbed before leveling".
a) "Turn off leveling compensation when using Raft" means that when the model in your .G-Code file has Raft as the platform addition, the printer turns off the “Enable Mesh Data Compensation" function during printing, and the printer does not compensate offset value when printing.
b) "Heat up heatbed before leveling" means that the printer will heat the print bed before each leveling. The heating temperature and time depend on the filament you use.

Figure 16 Advanced Settings.
[ Pro3 Series-How to Level the Bed-V1.0]
-END-
