Tools:
① 2.5 mm hex wrench
② Phillips screwdriver


A. Unplug the filament guide tube from the quick connector, and remove the filament and spool(s) from the printer
Before accessing the power supply unit at the base of the printer, it is recommended to remove any filament spools from the printer.
If the machine can be powered on and the nozzles can be heated to unload filament, please proceed with the following instructions. Otherwise, skip to Step 4 to disconnect the guide tube and cut the filament 1-2 inches above the quick connector. When power is restored, unload the remnant filament with the following instructions.
When you are ready to unload the filament, please make sure that you have finished any printing task.
1. Select the “Utilities” tab on the screen.

Figure 1 Enter the “Utilities” tab.
2. Set the temperature of the nozzle to a sufficient unloading temperature. For example, the Raise3D PLA default loading temperature is 215°C. In this guide, we will demonstrate how to perform this procedure using the right nozzle as an example.
Set the R-nozzle (right side) temperature to 215°C.

Figure 2 Set the temperature of the nozzle to a sufficient unloading temperature.
3. Select "Unload", and the nozzle will start heating. When the nozzle reaches the target temperature of 215°C, select "Unload". The extruder will pre-extrude the remaining filament and start to withdraw the filament.

Figure 3 Unload the filament.
4. Firmly depress the quick connecter ring, and pull out the filament guide tube.

Figure 4 Depress the quick connector, and pull out the filament guide tube.
5. Gently assist the filament out of the extruder. After the filament is completely removed from the extruder, select "OK" on the touchscreen to end the unloading.

Figure 5 Gently assist removing the filament from the extruder.
6. Turn off the printer and disconnect the power cord.

Figure 6 Turn off the printer and disconnect the power cord.
7. Carefully remove the filament spool while avoiding unwinding/loosening the wrapped coils, which would likely cause knots if filament was allowed to tangle.


Figure 7 Remove the filament spool.
B. Remove the Power Supply Unit
1. Slowly and carefully guide the printhead to the left-most side of the build area.
Facing the printer’s front side (viewing the touchscreen), carefully lay the machine on its left side. It is recommended to have assistance when performing this maneuver.
Important: Do NOT tip onto the side of the printer's front door, filament side door, nor rocker switch/power plug side.

Figure 8 Carefully lay the machine on its side.
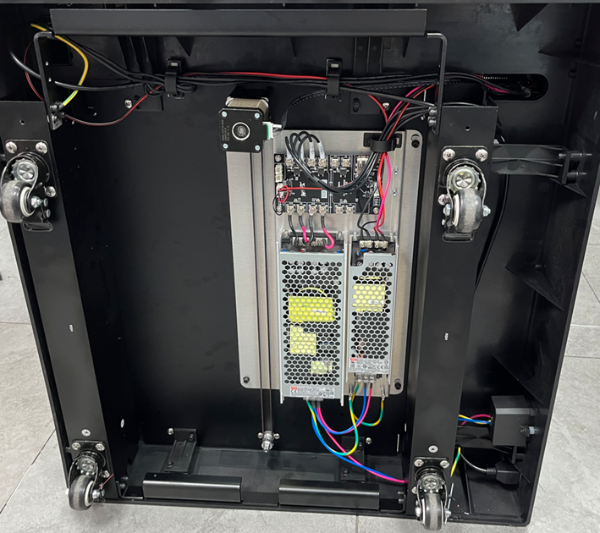
2. Use a Phillips screwdriver to remove the 4 screws on the underside of the printer to remove the bottom cover.


Figure 9 Remove the bottom cover.
The disassembly method of the MEAN WELL UHP-200-24 power supply (right power supply unit) is exactly the same as that of the MEAN WELL UHP-500-24 power supply (left power supply unit). Please refer to the MEAN WELL UHP-500-24 power supply (left power supply unit) to disassemble the MEAN WELL UHP-200-24 power supply (right power supply unit).
3. Use a Phillips screwdriver to loosen the 4 terminal screws at the top (as shown in the red circle) of the power supply, and remove the 4 connected wires while paying careful attention to their respective positions on the terminal, as shown in the figure below.


Figure 10 Loosen the 4 screws at the top of the power supply to remove the connections.
4. Firmly press on both sides of the bottom transparent cover to remove the guard, remove the 3 terminal screws using a Phillips screwdriver, and disconnect the 3 wires.
Important: Note the position of the connecting wires (from left to right: yellow-green mixed color cable, blue cable, and red cable).


Figure 11 Firmly press on both sides to remove the bottom transparent cover, remove the 3 terminal screws with a Phillips screwdriver, and remove the 3 connecting wires.
5. Use a 2.5 mm wrench to remove all 4 screws used to affix the switching power supply to the printer, and then carefully remove the MEAN WELL UHP-500-24 power supply.


Figure 12 Use a 2.5mm wrench to remove all 4 screws affixing the switching power supply to the printer, and remove the MEAN WELL UHP-500-24 power supply.
C. Install the Replacement MEAN WELL UHP-500-24 Power Supply
1. Use a Phillips screwdriver to return the 3 terminal screws, with their corresponding wires, in the order shown in the figure below.


Figure 13 Use a Phillips screwdriver to secure the 3 connecting wires.
2. Use a 2.5 mm wrench to fasten the 4 screws securing the MEAN WELL UHP-500-24 power supply to the printer, and return the transparent cover over the lower terminals.


Figure 14 Fasten the 4 screws on the MEAN WELL UHP-500-24 power supply, and return the transparent cover over the lower terminals.
3. Use a Phillips screwdriver to tighten the 4 terminal screws at the top connectors, paying careful attention to the position of the cable positions, as shown in the figure below.


Figure 15 Tighten the 4 screws at the top connectors.
D. Check if the replacement MEAN WELL UHP-500-24 power supply is installed correctly
1. Temporarily plug in the power cord, switch on the printer at the rocker switch, and visually verify that the green LED indicator on the power supply illuminates. If the green LED does not illuminate, follow the above steps to check if the installation is correct.

Figure 16 Check if the replacement MEAN WELL UHP-500-24 power supply is installed correctly.
E. Install the bottom plate and carefully upright the printer
Switch off the printer at the rocker switch and disconnect the power cord.
Use a Phillips screwdriver to fasten the 4 screws to secure the bottom cover on the underside of the printer.
Carefully upright the printer. It is recommended to have assistance when performing this maneuver.


Figure 17 Install the bottom plate and carefully upright the printer.
[15.086.EN.2.0-20231222-Pro3 Series-How to Replace the Power Supply Unit]
-END-