
Users can see the number of the 3d printers in their team, and how many have each status. Each status is a link, if the user clicks on one these statuses, then the system will show user the printer list associated with this status.

This part shows the number of printers in each status as well as the total amount. By clicking on the name of each status, user can check the list of printers in that particular status. Each status is described below.
Standby: Printer is free, the printer will start to print if assigned a user create a printing job.
Printing: Printer is printing a model.
Done: Printer has finished the last printing job. (User must press the "Done" button on 3D printer before starting the next job)
Busy: Printer is busy has occurred if printer is loading filament, stoping printing or something else.
Error: Printer has an error, if a printer has this status the User should check the printer.
Offline: The printer has become disconnected from the network or internet.
User can check the information of team in this part.
Team Name: The name of the team, only a team owner can edit it.
Team Type: There are two types of team in the system: Individual and Company. Individual team has a maximum of 5 members, and Company team has a maximum of 20 members.
Established Date: The date the team was established or created.
Binding Account: User can bind 3d printers through this account in Wifi environment.
Binding Key: User can use a key file to bind a 3d printer by USB, please save the key to USB to use on a printer.
Member: User can see the avatar of each team member or the amount of team members on the team, you can click button to send a team invitation email to a new user.
This part shows number of print jobs in each of the different status. Each status is described below.
Hold: The printing job is temporarily held. User can start the print by clicking the start button in each print job.
Ready: The printing job will start after the printer finish the last job.
Note: Automatic print jobs will stay as ready until the print is completed. When a manual job is received between automatic jobs, the manual job will take priority.
Printing: The job is currently printing.
Complete: The job has completed. No matter automatic or manual job, user must select the “Done” button on printer’s touch screen, then job will change to complete status.
User can check work order information in this section, and there are 3 parts:
My Operation: The orders that are currently in progress.
My Creation: The orders that have been created.
My Tracking: The orders that are being tracked.
For each section, the amount of orders in different status is shown. The order list of different status can be seen by clicking on the respective icon. User can use the red/white button to show additional sections. The bottom part lists the three newest orders. User can click on the order to see more details.
Tip: More information about operation/creation/track will be discussed in Section - Work Order.
User can check Filament Usage Statistics of the printers from the last 7, 14, or 28 days.
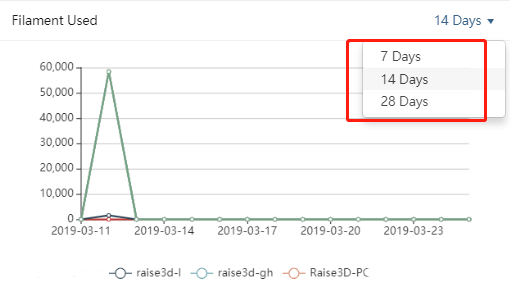
Users can also check the chart information they want by filtering, and the list of filtered filament will be ranked according to the amount of filament used.

