
The Team Files module shows all the shared files that was uploaded by team members. Authorized team members have access to all the files in this module.
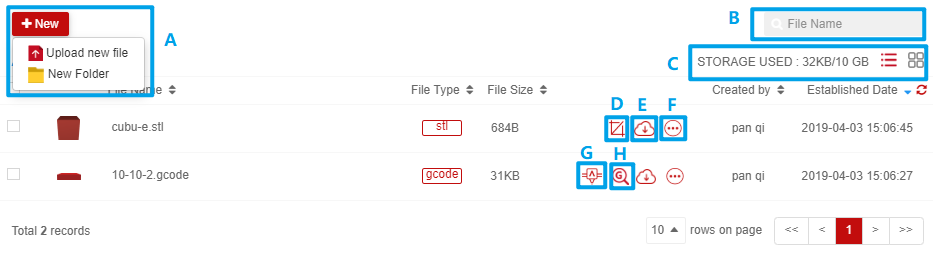
1. New - [A]
1. Click Upload button;
2. Choose File (except data file or folder);
3. Click Complete button when progress bar becomes blue.
1. Click +New Folder;
2. Input folder Name;
3. Click Confirm.
The Search bar is located in the top right corner, enter the File / Folder name. Approximate string matching is supported.
Storage Used is in the top right corner. Left side is Storage Used and right side is Total Storage. Example, 204MB / 5GB (204MB Used of 5GB Total Storage)
User can view files in two display modes.
1.List mode: Click  button.
2.Tile mode: Click  button.
Only a GCode file can start a print. User can slice STL file into Gcode file on Raise Cloud.
1. Find STL file, and click slice button;
2.Edit model;
3.Click Start Slice Now!
4.GCODE file will appear in file module automatically.
Hover mouse cursor on File, then click button.
User can start the print with Gcode file.
1. Find GCODE file and click print button;
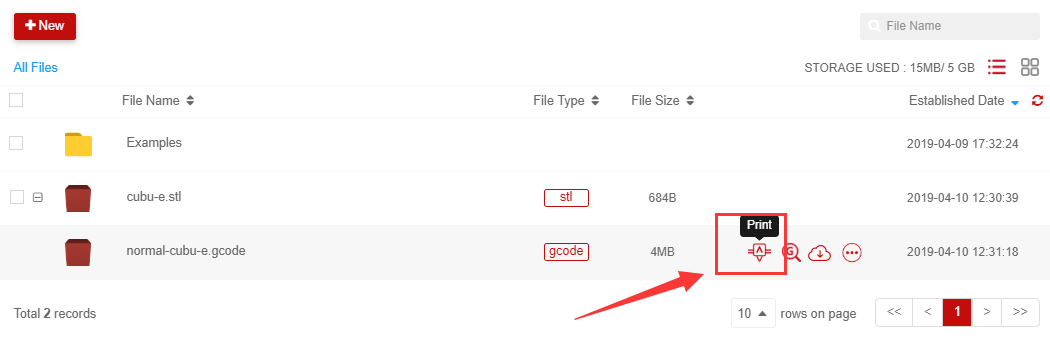
2. It will change to printer page;
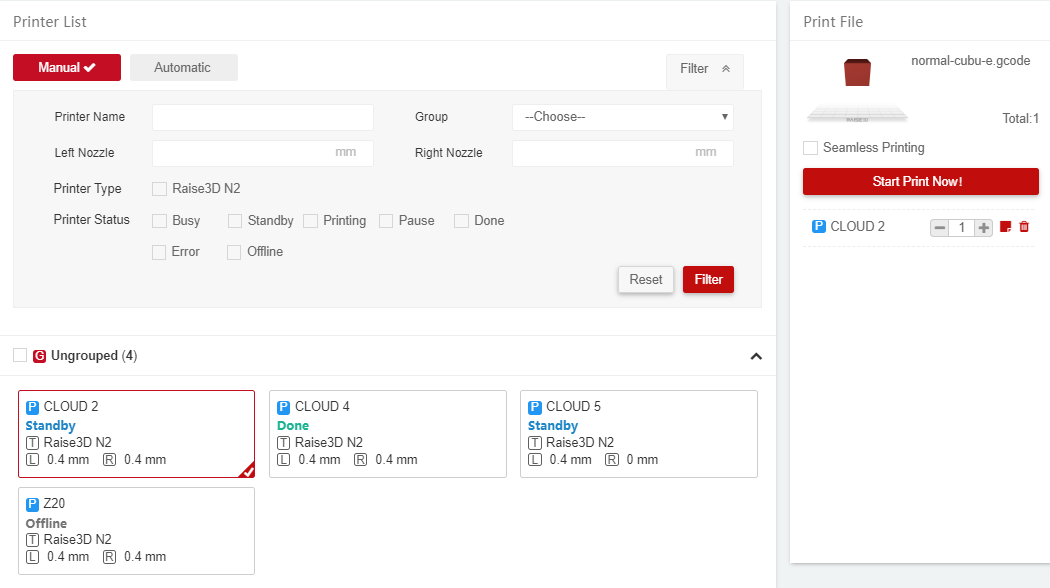
3. User can choose the type of printing job:
Manual: Assign job to printer by manually;
Automatic: System will assign the job to any free printer in the chosen group.
4. Choose the printer (if manual) any free printer in the chosen group or the group of printers (if automatic). Note that selecting multiple printers or groups will create multiple printing jobs.
5. Filter out the desired printer. Click Reset to clear all conditions.
6. Enter amount of models that need to be printed. System will count the total number of models.
7. Click Start Print Now! To create the printing job. The selected printers will start printing once they are in ready status. User can check the job progress in 3D Printer module.
Tip: User can choose “Seamless Printing” to hide the printing job you generated.
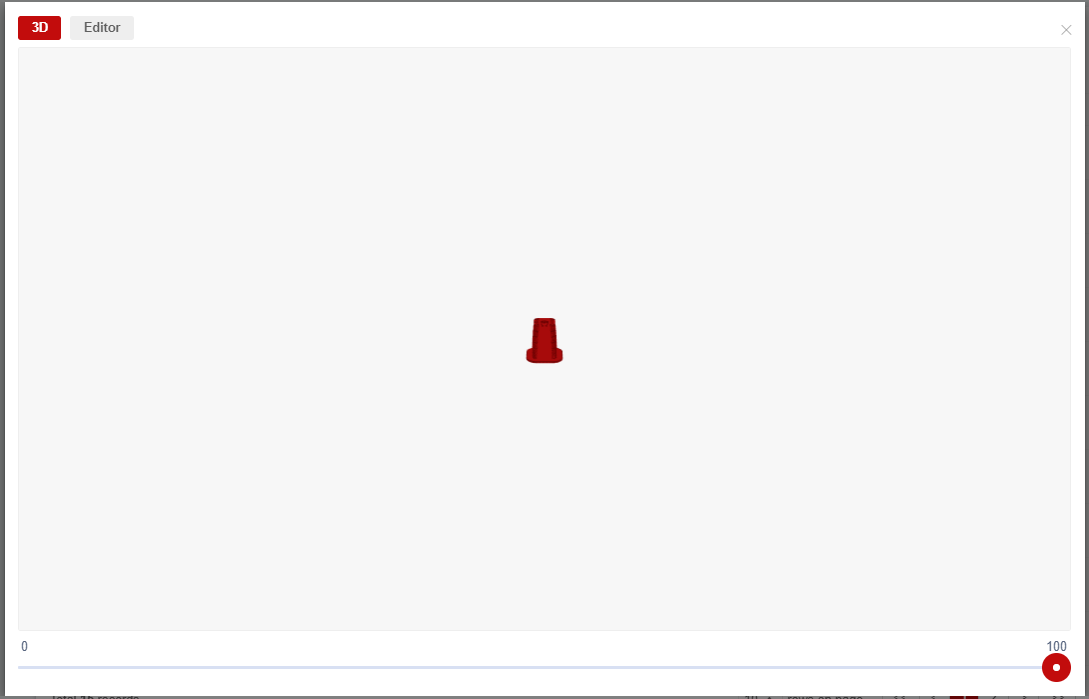
1. Find Gcode file, and click view button;
2. View Gcode in 3D mode or edit Gcode file.
1.Find Gcode File, hover mouse cursor on it, and click send to button;
2.Choose one or more printers;
3.Click submit;
1. Hover mouse cursor on File / Folder, then click button;
2. Click Rename;
3. Click Confirm.
1. Hover mouse pointer on File / Folder, then click button;
2. Click Delete;
3. Click Confirm.
If the model is not sliced on Raise Cloud, data file needs to be uploaded manually for user to be able to check the detailed information of the model.
1. Click , or click GCODE file;
2. Select Upload Data;
3. Choose DATA file.
13. Arrange to – [F]
1. Find Gcode file, hover mouse pointer on it, and click arrange to button;

2. Choose one STL file, and click confirm.

3. Gcode will be merged with the STL file.
User can set permission for your private files in Team Folder:
1.Hover mouse cursor on File, then click ;
2.Click Permission button;
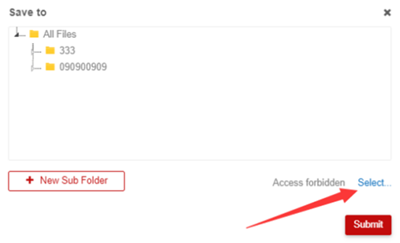
3. Select the file path. Click Select to allow access to certain team members. Otherwise the file will be shared with the entire team.
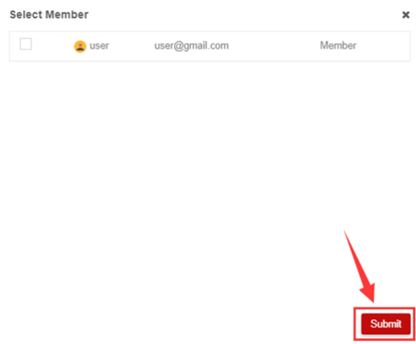
4. Select the members that user wants to allow access to, and click Submit.
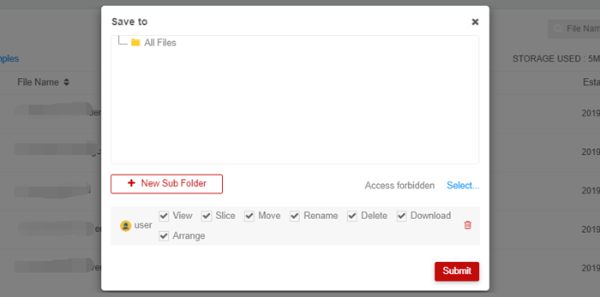
5.Select the type of access that user wants to allow. For example, restricted members can not move the file when user selects Move.
1. Hover mouse cursor on file, then click  ;
;
2. Click move to…;
3. Choose private path and click submit.
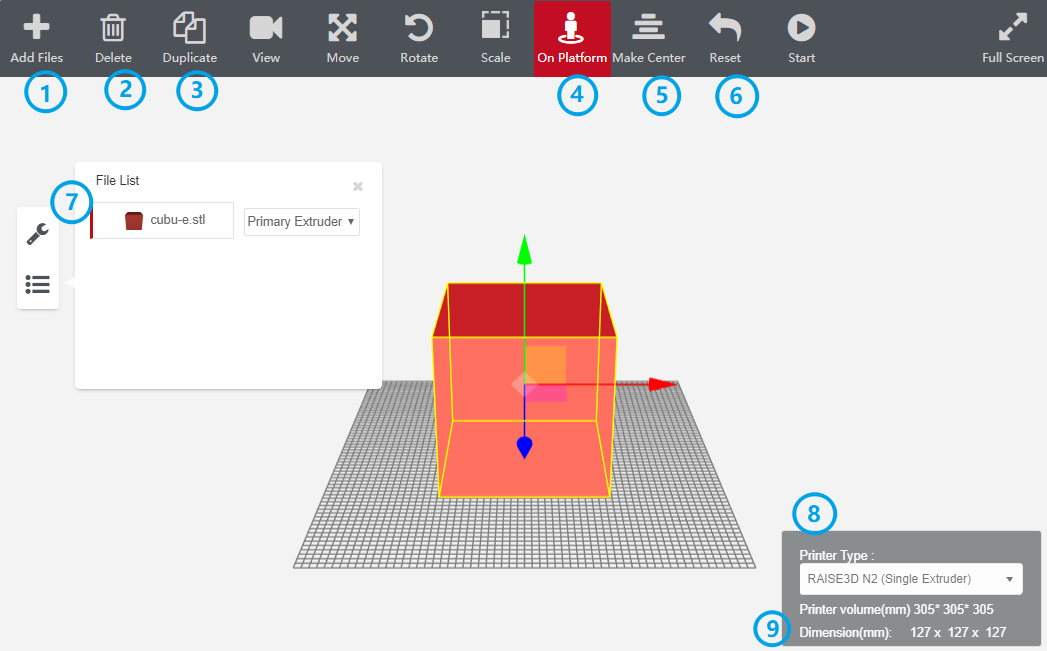
1. Add STL File
To slice more than one model, you can click button to add File.
2. Delete File
Click Delete button if you want to delete file.
3. Copy File
User can click Duplicate button to copy file.
4. Platform Model
Use on Platform button to place the model on top of the printing bed.
5. Center Model
Use Make Center button to center the model.
6. Reset Model
Use Reset button to restore the model to its original state
7. Choose Extruder
With a Dual Extruder Printer Type selected user can choose right or left extruder.
8. Choose Printer Type
Choose the correct type of printer. Different printers have different sizes, and could have either single extruder or dual extruder.
9. Check Size Of Printer And Model
Check the size of the printer and the model in the top left corner and the bottom right corner.
10.Move Model
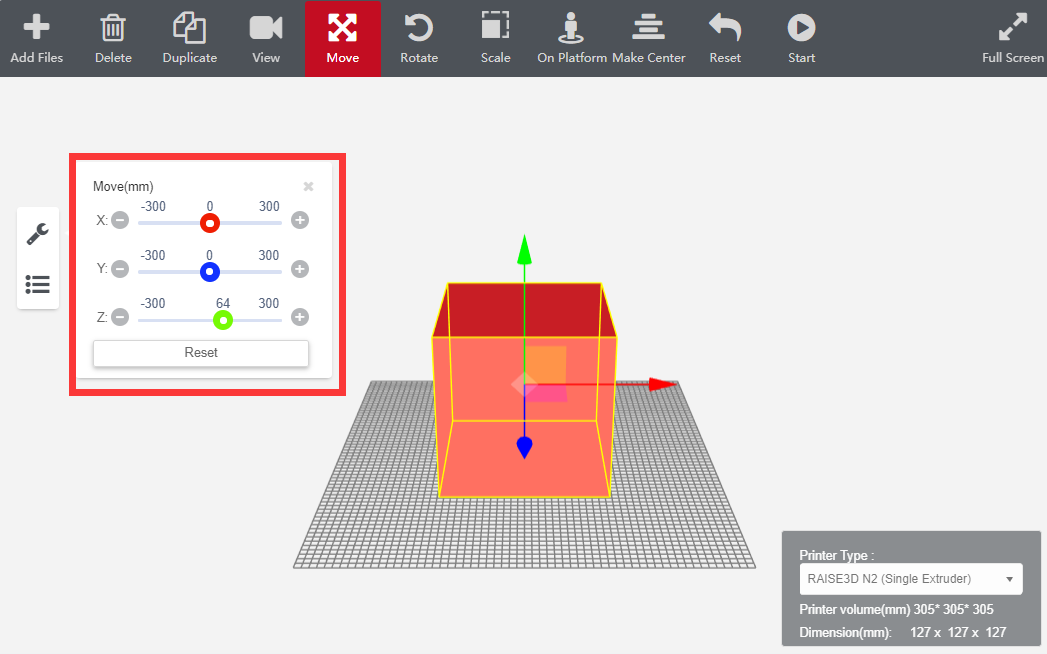
Move the model by dragging it around, or through MOVE tab. The range of movement is:
X-AXIS: Red, -300-300;
Y-AXIS: Blue, -300-300;
Z-AXIS: Green, -300-300.
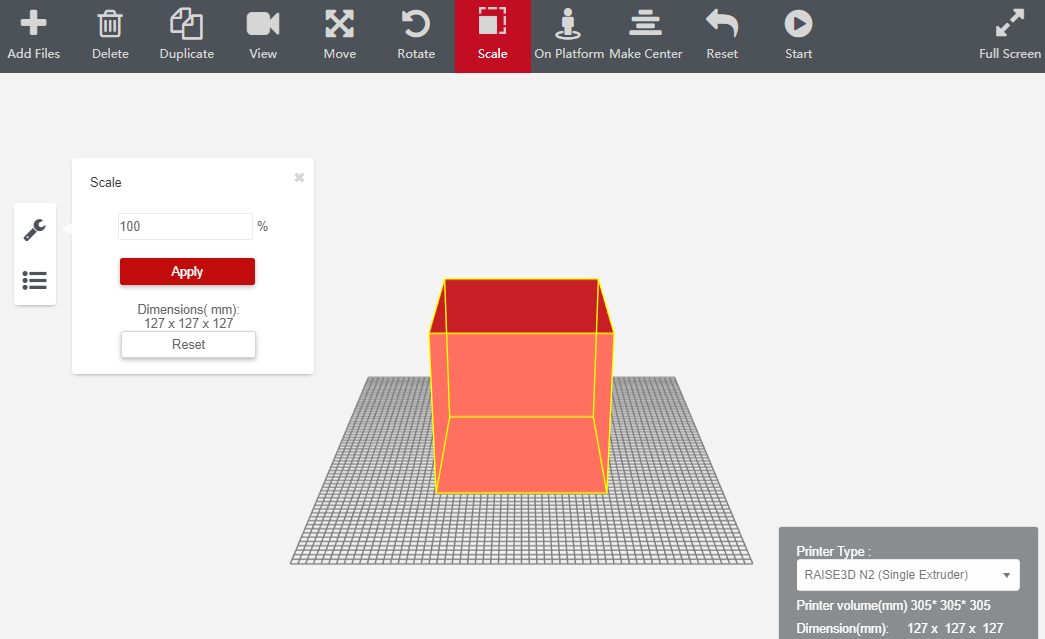
11. Scale Model
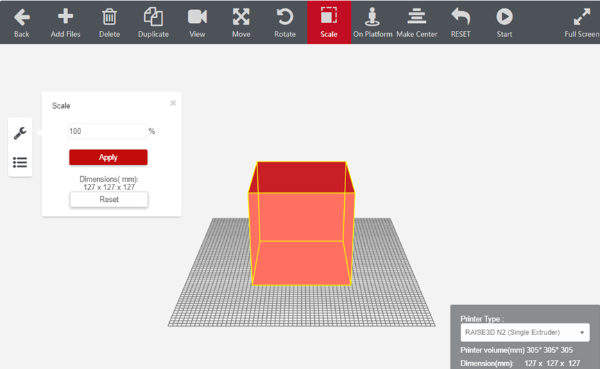
User can input manual percentage number to scale model.
12. Rotate Model
Rotate the model around X-axis, Y-axis or Z-axis by dragging it or through rotate tab. The maximum angle is 360 degrees.
13.Slicing Setting
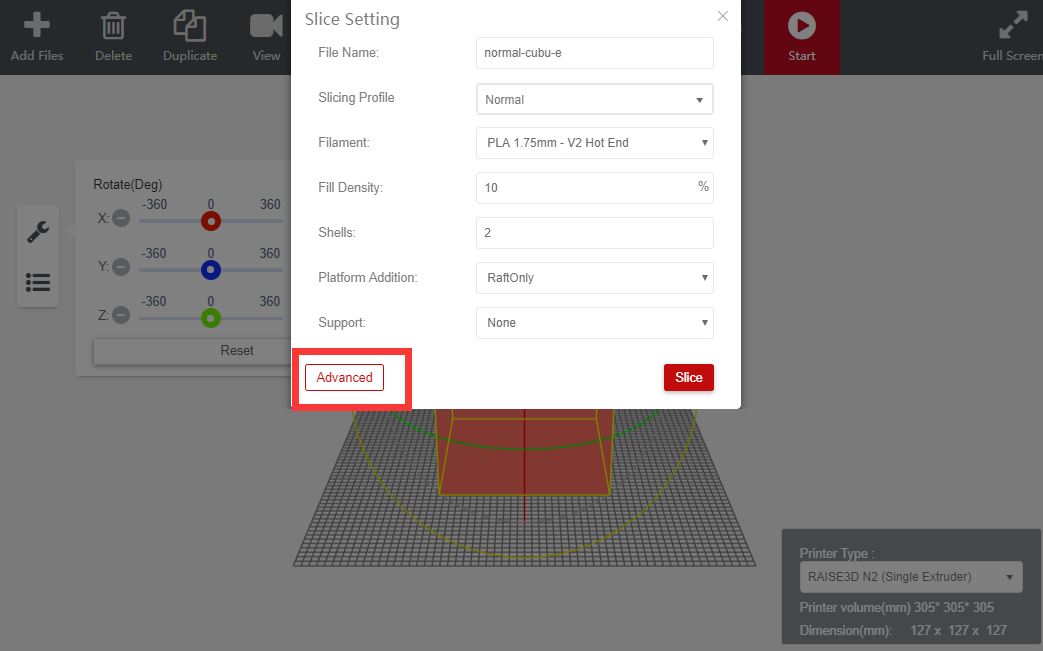
Modify the variables of Slicing template. Click Advanced button for more detailed settings.
Tip: The model will be imported according to the original coordinate, if user want move it to center, please click center button in page.
