
Option 1: Click Export button in the Estimated Print Result window to export the sliced G-Code file as Figure 1.

Figure 1: Export the sliced G-Code files in the Estimated Print Result window.
Option 2: Click Export to Local Disk button in main screen to export the sliced G-Code files as Figure 2.

Figure 2: Export the sliced G-Code files in the main view.
After exporting the G-Code file, you can click the "Show in Folder" button to view the sliced file with the folder. You can also choose whether the dialog box pops up next time.

Figure 3: Show in Folder.
1. If you want to save the sliced .G-Code files, you can export the files directly to your USB storage or to folders in your computer. Then copy the sliced .G-Code files (.gcode file and .data file) to USB storage. It is important to copy both files.
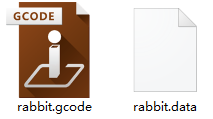
Figure 4:The .gcode file and .data file are both practicable for Raise3D printers.
2. Insert a USB or SD storage card into your printer and select the file to start your first print (SD card is only applicable to N series printers).

Figure 5: If you are using USB drive, press the "USB storage" to check the files inside. If you are using SD card, press "SD Card" to check the files inside.
-END-
