

Figure 1: GCode Tab.
(1) Start GCode
Start GCode refers that custom GCodes which will be executed at the start of a print job (after the preheating extruders and the heat bed).
Start GCode when the number of extruder is refers to selecting extruder’s number to choose its start GCode. There are two options. 1 refers to the start GCode when the number of extruders is set to be 1. 2 refers to the start GCode when the number of extruders is set to be 2. Single-extruder print and dual-extruder print have difference in Start GCode.

Figure 2: Selecting extruder’s number for your Start GCode.
Insert Heatup GCode Automatically in Start GCode refers that the heatup GCode will be inserted into start GCode automatically.
Heatup code should be inserted to the start GCode, if not the printer will start print without heating nozzle and heating heated bed. If you want to change the heatup GCode to be customer code, please disable this option and input your codes.
Heatup Sequence refers to the heating order.
Heatup heated bed and nozzle(s) simultaneously refers that with this function enabled the heated bed and nozzle(s) will be heated up at the same time.
Heatup nozzle(s) first refers that with this function enabled the nozzle(s) will be heated up first, then heating up heated bed.
Heatup heated bed first refers that with this function enabled the heated bed will be heated up first, then heating up nozzle(s).

Figure 3: Heatup Sequence.
You can add more slice settings by clicking the Add More button, a dialog will pop-up as in Figure 4, then click OK to add the slice setting into right box. Delete the setting by selecting the value in right box and clicking the Remove Selected button.
You can add the Placeholder to left code box by double-clicking the slice settings from the right list.

Figure 4: Adding more placeholder options for GCode.
(2) End GCode
End GCode refers to the GCodes being executed at the end of a print job.
Select the extruder number you want to check by selecting Number of Extruders. 1 refers to the end GCode when the number of extruders is set to be 1. 2 refers to the end GCode when the number of extruders is set to be 2.
Turn off Fan Cooling in End GCode with this function enabled the controllable cooling fan will be turned off at the end.
Reset Global Flow Rate to 100% in End GCode with this function enabled,
the global flow rate will be changed to be 100% at the end.
Traveling along Z axis after finishing printing models with this function enabled, build plate will move up along Z axis defined height after finishing printing models.

Figure 5: End GCode tab.
(3) Extruder Switch GCode
Extruder Switch GCode refers that custom GCodes will be executed when extruder change.
Note: It can be with an “if” command, such as: [if {new_extruder}=1] M104 T0 S160, meaning when using the right nozzle, lower the temperature of the left nozzle to 160 degrees.
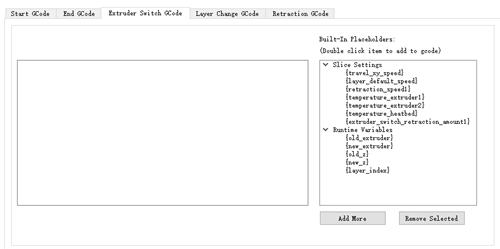
Figure 6: Extruder Switch GCode tab.
(4) Layer Change GCode
Layer Change GCode refers that custom GCodes will be executed when layer change.
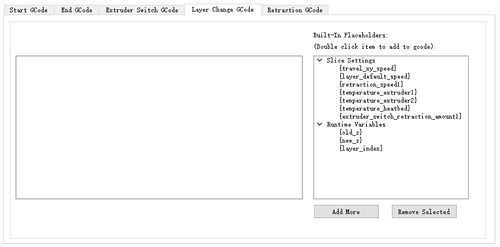
Figure 7: Layer Change GCode tab.
(5) Retraction GCode
Retraction GCode refers to the GCodes being executed when filament retracted.

Figure 8: Retraction GCode tab.
(6) Post-process Command
Post-process Command refers that the GCode can be delete or replace in batches.
Add refer to inserting the command into the Post-process command.
Replace SOURCE with TARGET refers that the occurrences under the TARGET tab will be replaced with the occurrences which are under the SOURCE tab.
For example: Insert "G92 E0" into Source tab and insert "G1 X20 Y0 F140 E30" into Target tab as Figure 8, then set the Command type to be Replace SOURCE with TARGET. Then press OK button the Post-process Command will be edit as Figure 9.
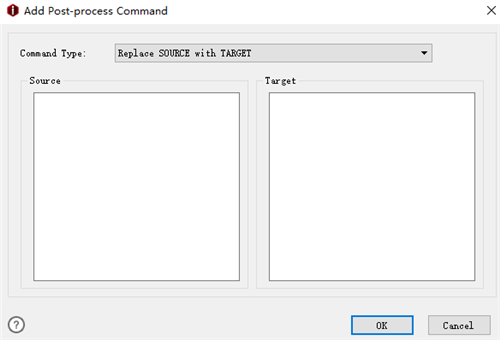
Figure 9: Insert the GCode occurrences into Source and Target windows.

Figure 10: Post-process Command tab.
Remove all occurrences of Source refers that with this function enabled the occurrences will be removed which is under the SOURCE tab.
For example: Insert "G92 E0" into Source tab and insert "G1 X20 Y0 F140 E30" into Target tab as Figure 11, then set the Command type to be Remove all occurrences of Source. Then press OK button the Post-process Command will be edit as Figure 12.
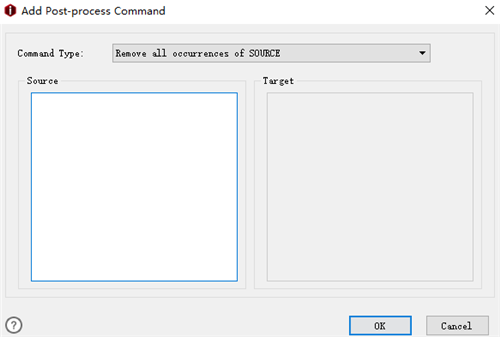
Figure 11: Enter the occurrences into Source and Target tab.

Figure 12: Post-process Command tab “remove all occurrences of Source” feature.
Remove refers to deleting the command from Post-process Command tab.

Figure 13: The Post-process Command tab “Replace Source with Target” feature.
Customize GCode filename refers to defining the GCode filename.
GCode Filename Format refers that with this function enabled, the GCode filename can be user-defined.
Note: Take the former figure as an example, if the printer type is Raise3D Pro2 (abbreviated R3D_PRO2), the material type is PLA 1.75mm (abbreviated PLA), the slice template’s layer height is 0.25mm and the model name is 20mm_Calibration_Box, then the exported GCode file name after slicing will be 20mm_Calibration_Box_R3D_PRO2_PLA_0.2500mm.
Note: 1. Filament Type Abbreviation refers to abbreviation for filament type.
2. Printer Type Abbreviation refers to abbreviation for printer type.

Figure 14: Customize GCode Filename.
-END-
