
Enable Cooling Fans: With this function enabled, the controllable cooling fans’ speed can be edited, like Maximum Fan Speed, Fan Control and Blip fan speed to 100% when starting from low speed.
(1) Cooling
Minimal Layer Print Time: The minimum time spent on a layer to provide enough cooling time for the just printed features in this layer before starting to print next layer.
Slow Down Printing Speed: With this function enabled, printing speed will be reduced to the value between current printing speed and the Minimal Printing Speed. This function works only when the total time spent on a single layer is less than the Minimal Layer Print Time.
Minimal Printing Speed: We need to reduce printing speed (not slower than the Minimal Printing Speed) to increase print time when the single layer printing time is less than Minimal Layer Print Time.
Avoid slowing down outer shell speed: When the printing speed is reduced to meet the minimum printing time for a single layer, the printing speed of the outer shell will not be reduced, thereby avoiding inconsistencies or side defects in the appearance of the prints’ outer shell printed by some models and filaments.
Increase Fan Speed: With this function enabled, fan speed will be increased between the Maximum Fan Speed and the current fan speed. This function works only when the total time spent on a single layer is less than the Minimal Layer Print Time.
Maximum Fan Speed: The maximum speed of the extra cooling fan. It can be triggered as long as the layer printing time is less than the Minimal Layer Print Time, and the fan can be adjusted between the maximum and the current fan speed.
(2) Fan Control & External Cooling
Fan Control:
The following fans are controllable on Raise3D printers:
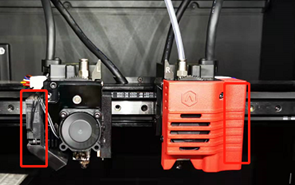
- The downward model fan on the single extruder of the N Series. (The side extruder cooling fan of the Raise3D N Series is constantly on)
- The two sides’ fans featured on the Pro2 Series, Pro2 Hyper Speed Series, Pro3 Series, Pro3 Hyper Speed Series, Pro3 HS Series, E2, E2CF, and RMF500.
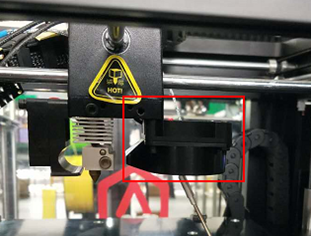
N Series Printer
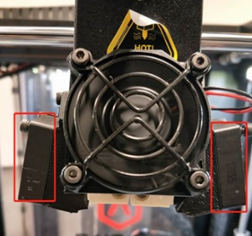
Pro2 Series Printer
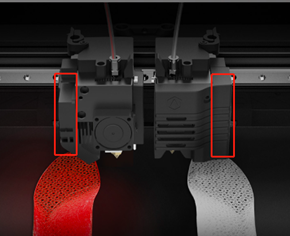
E2 Printer
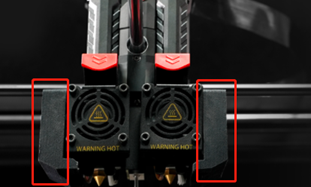
Pro3 Series Printer
E2CF Printer
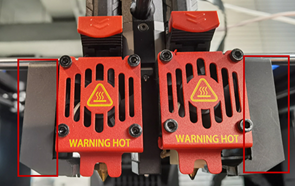
Pro3 HS Series Printer
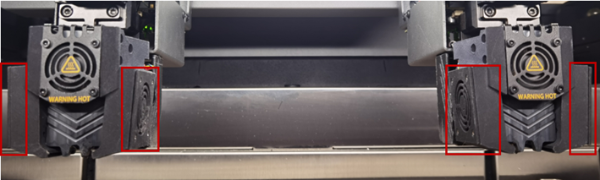
RMF500 Printer
Figure 1: Controllable cooling fan(s) for different printer models (The above fans’ diagrams are for reference only, and the actual appearances are specific to the actual products).
Layer: Selects at which layer to turn on the fan.
Fan Speed: Control the speed of the downward model fan on the specified software-controlled fans. You can add the specific layer at which you want to change the fan speed by clicking the Add Fan Point button and input the speed in the right box. It can be deleted by selecting the value you want to remove in the right box and clicking the Remove Fan Point button.
Note: If you want to change the fan’s speed, please enable “Enable Fan Speed Control (Use PWM-Controllable Fans)” function in the Printer Settings panel as shown in Figure 2. Otherwise, this tab will be disabled and cannot be edited, as shown in Figure 3.
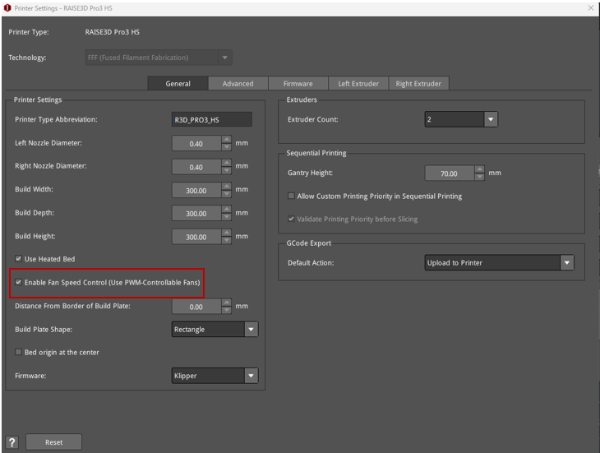
Figure 2: The function of “Enable Fan Speed Control (Use PWM-Controllable Fans)”.
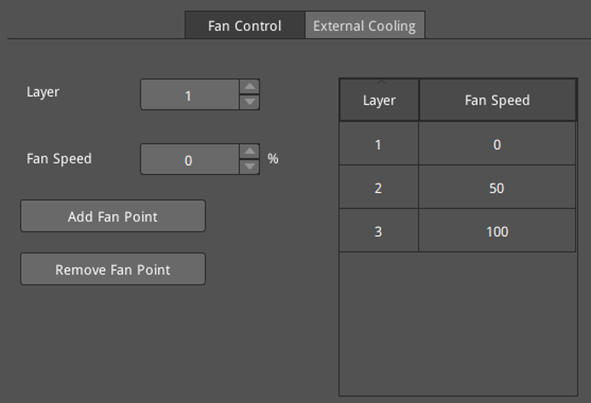
Figure 3: The Fan Control tab.
External Cooling: IdeaMaker can control the external cooling fan for Pro3 (HS) series printers.
Layer: Selects at which layer to turn on the external cooling fan.
Enable External Cooling: Turn on/off the external cooling fan for a specified layer. You can add the specific layer at which you want to turn on the external cooling fan by clicking the Add Fan Point button, and delete it by selecting the value you want to remove in right box and clicking the Remove Fan Point button.

Figure 4: The External Cooling tab.
(3) Blip fan speed to 100% when starting from low speed
Low Fan Speed Threshold: The fan speed will be increased to 100% automatically if the current fan speed is slower than the threshold.
Blip Fan Speed Pause Duration: Pauses the printer for a period in milliseconds when the fan speed has blipped to 100% and is about to be increased to a higher speed.
(4) Other
Wait for movement finished before changing fan speed: With this function enabled, ideaMaker will output the M400 command before the M106 command, and then execute the M106 to change the fan speed after the movement command is complete.
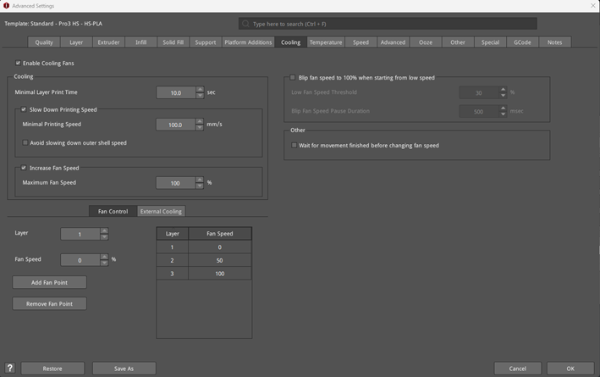
Figure 5: The Cooling tab.
