
Printer Settings:
Printer Type Abbreviation: Writes an abbreviated name for the printer model.
Left/Right Nozzle Diameter: The diameter of the left/right nozzle of the printer determines the extrusion width, which is 0.4mm by default. It is generally not recommended to adjust the nozzle diameter.
Build Width/Depth/Height: The maximum length, width, and height dimensions of a printable model.
Use Heated Bed: With this function enabled, the heated bed will be used to keep the extruded material heated during the print.
Enable Fan Speed Control (Use PWM-Controllable Fans): With this function enabled, the fan speed can be controlled.
Distance From Border of Build Plate: Keeps a safe distance from the border of the build plate, as shown in Figure 1. This function will check if there are models placed outside the extruder’s printable area. If the model has exceeded the spacing distance of the border, it will turn red, and the Printability panel will prompt "Outside Printable Area", as shown in Figure 2
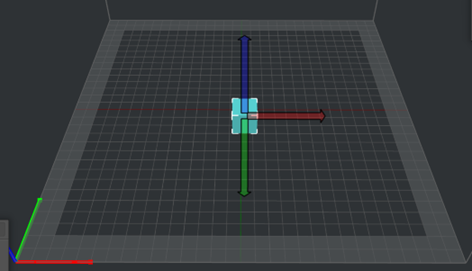
Figure 1: The “Distance From Border of Build Plate” is set to 20mm.
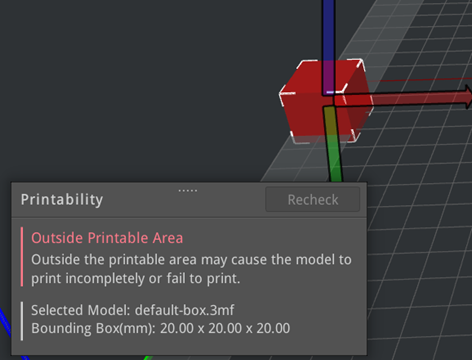
Figure 2: The model is placed outside the printable area.
Build Plate Shape: The shape of the printing build plate, which can be set to Rectangle or Ellipse.
Bed origin at the center: With this function enabled, the coordinate origin in the GCode file will be set to the center point of the build plate. With this function disabled, the coordinate origin will be set to the left-front corner of the build plate.
Notes:
1. This function works only for third-party printers.
2. Make sure the printer firmware supports this function before using it.
Firmware: The version of the motion controller board firmware.
Ø The firmware is Marlin for Raise3D N-Series printers.
Ø The firmware is Raise3D Pro2 for Raise3D Pro2 Series and Pro2 Hyper Speed Series printers.
Ø The firmware is RepRapFirmware for Raise3D E2, E2CF, Pro3 Series, Pro3 Hyper Speed Series and RMF500 printers.
Ø The firmware is Klipper for Raise3D Pro3 HS Series printers.
Extruders:
Extruder Count: Sets the number of extruders used by the printer. If you have set the Extruder Count to 1, the Left Extruder and Right Extruder tabs will change to the Primary Extruder tab in the Printer Settings panel.
Sequential Printing:
Gantry Height: It refers to the distance between the nozzle and the crossing rods for the Raise3D Pro2 Series, Pro2 Hyper Speed Series, Pro3 Series, Pro3 Hyper Speed Series and Pro3 HS Series printers, as shown in Figure 3.
Also, it refers to the distance between the nozzle and the guide rail for the Raise3D E2, E2CF and RMF500 printers, as shown in Figure 4.
Note: Figures 3 and 4 are only for illustration purposes, and the actual extruder’s appearance is subject to the actual product.

Figure 3: The Gantry Height refers to the distance between the nozzle and the crossing rods.
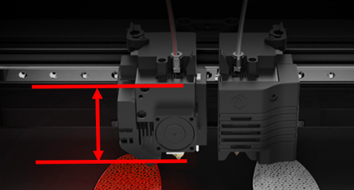
Figure 4: The Gantry Height refers to the distance between the nozzle and the guide rail.
Allow Custom Printing Priority in Sequential Printing: With this function enabled, you can arrange the printing order of the models manually. The option of Auto-Update Printing Priority will be displayed in the Sequential Printing tab in the Prepare to Slice panel. With this option enabled, ideaMaker will automatically arrange the printing order for the model, as shown in Figure 5. With this option disabled, you can manually adjust the printing order by selecting a model from the drop-down list and dragging it downwards or upwards.
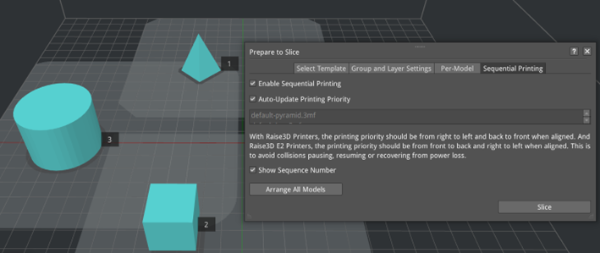
Figure 5: Enable Auto-Update Printing Priority.
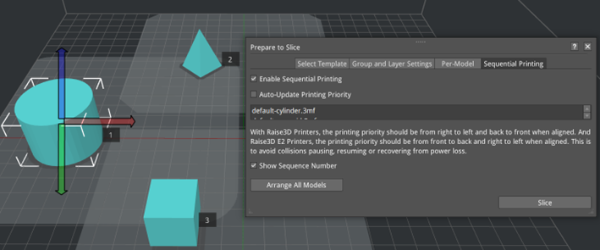
Figure 6: Manually update the printing order.
Validate Printing Priority before Slicing: With this function enabled, ideaMaker will check whether the printing order of the model is valid or not. For Raise3D printers, the printing priority should be from right to left and back to front. For Raise3D E2 printers, the printing priority should be from front to back and right to left, when aligned. This is to avoid collisions when pausing, resuming or recovering from power loss. It is recommended to validate the printing priority with Raise3D printers.
GCode Export:
Default Action: The default export path for printing files.
Ø Export to Local Disk: Saves the sliced GCode files to a local disk.
Ø Upload to Printer: Uploads the sliced GCode files to a printer.
Ø Upload to RaiseCloud: Uploads the sliced GCode files to RaiseCloud.
Ø Upload to Other Server: Uploads the sliced GCode files to other servers, such as OctoPrint and Repetier.
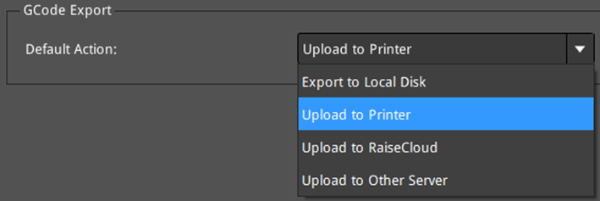
Figure 7: Select a default export action for the sliced files.
