
Tools:
① 2mm hex wrench
② 2.5mm hex wrench

Component:
③ The Extruder Motor for replacement

A. Remove the Left/Right Extruder
1.You need to remove the left/right extruder. Refer to parts A to C in the document of “Pro3 Series-How to Replace the Left Extruder” for the way of removing the left extruder. Refer to parts A to D in the document of “Pro3 Series-How to Replace the Right Extruder” for the way of removing the right extruder.
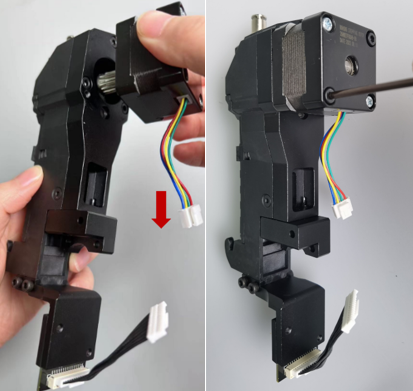
B. Replace the Extruder Motor
1.Use the 2.5mm hex wrench to unscrew the two black screws as shown below to remove the current extruder motor.


2.Install the extruder motor for replacement back on the extruder and tighten the two black screws with the 2.5mm hex wrench.
Note: The side with motor cables should face down.
C. Install the Left/Right Extruder
1. You need to install the left/right extruder back. Refer to parts D to F in the document of “Pro3 Series-How to Replace the Left Extruder” for the way of installing the left extruder. Refer to parts E to F in the document of “Pro3 Series-How to Replace the Right Extruder” for the way of installing the right extruder.
[15.118-EN.1.0.20230801-Pro3 Series-How to Replace the Extruder Motor]
-End-
